Der Beitrag Ham and Cheese Wraps erschien zuerst auf kitchensplace.
]]>
Are you giving a party or are you invited to a party yourself? Then these ham and cheese wraps are just the right thing for all guests. All you need for the small rolls is a couple of tortilla wraps, some cream cheese, crunchy iceberg lettuce, fresh ham and creamy organic cheese. Of course, you can just leave the ham out if there are vegetarian guests on site. When all the ingredients are ready, all you have to do is coat the wraps one after the other with cream cheese and put some salad in the middle. Then you put the cheese and ham on the salad and roll the wraps up very tightly. The tighter the wraps are rolled, the nicer the result will be! Finally, you can insert small toothpicks every 3-4cm into the warp roll and then cut off small rolls at the same distance.
My ham and cheese wraps are not only ideal as finger food for parties or other occasions. You can also prepare these wraps as meal prep and store them whole in aluminum foil in the refrigerator. So you always have a delicious and light lunch for work or a snack ready to hand. If you like, you can of course fill the wraps differently! Let me know what other ideas you have. 
If you are in the mood for more finger food recipes and ideas for party snacks, please have a look around my recipe collection.

Nutritional Information per serving (approx. 5 rolls):
Calories: 335 – Protein: 16g – Fat: 18g – Carbs: 28g
Käse-Schinken-Wraps

Ingredients
- 6 Tortilla Wraps
- 100g Frischkäse
- 3-4 Blätter Eisbergsalat
- 6 Scheiben Kochschinken
- 6 Scheiben Gouda
Directions
- Step 1 Die Wraps mit Frischkäse bestreichen. In der Mitte der Wraps jeweils eine Bahn Salat, Schinken und Käse auslegen. Hierzu den Schinken und den Käse längst halbieren und über die Länge der Wraps auslegen.
- Step 2 Die Wraps eng zusammenrollen, sodass der Inhalt schön fest zusammengerollt wird. Anschließend die Wraps in 3-4cm breite Stücke schneiden und mit einem Zahnstocher aufspießen.
If you like you can find my Pinterest here or you can pin the following picture directly to your Pinterest.


Der Beitrag Ham and Cheese Wraps erschien zuerst auf kitchensplace.
]]>Der Beitrag Pizza roses erschien zuerst auf kitchensplace.
]]>
Pizza roses are wonderful finger food and an eye-catcher at every party. They are easy to prepare, can be filled in a variety of ways, look great and taste incredibly delicious. I used salami and mozzarella in this recipe. The combination of salami and mozzarella is of course perfect, as the shape of the salami can perfectly imitate the rose petals. You can of course also try other fillings and combinations (e.g. Hawaii with boiled ham and pineapple), but in order to maintain the rose shape, it is important that at least one of your components retains a natural round or semicircular shape. Can you think of any other combinations that they can be filled with?
If you are looking for more finger food recipes, then take a look at my recipe category for Finger food & party snacks around. There you will find more delicious ideas for every occasion – for example my delicious ones Ham and cheese wraps or my crunchy ones Mini hot dog bites .

Nutritional information per serving of Pizza Roses
Calories: 285 – Protein: 14g – Fat: 11g – Carbs: 32g
Pizza Roses

Ingredients
- 400g pizza dough
- 100g strained tomatoes
- 300g sliced salami
- 200g grated mozzarella
- 1 tsp oregano
- salt
Directions
- Step 1 Mix the tomatoes with oregano and a pinch of salt. Then spread evenly on the rolled out pizza dough and sprinkle with mozzarella
- Step 2 Divide the dough into 6 even sheets. Then lay out halved slices of salami on each sheet so that the round edge extends beyond the edge of the dough, leaving the bottom edge of the dough free and the slices overlapping each other. (Tip: It’s best to watch the recipe video.)
- Step 3 Now fold over the free edge of the dough and cover the salami slices. Then carefully roll up the dough from one side
-
Step 4
Bake the Pizza Rosen in a muffin tray at 180 degrees convection for about 20 minutes.
If you like you can also find me here on Pinterest and pin the following pictures.


Der Beitrag Pizza roses erschien zuerst auf kitchensplace.
]]>Der Beitrag Salmon avocado tortilla with arugula and mayonnaise erschien zuerst auf kitchensplace.
]]>

I currently see crispy baked tortilla wraps more often. It is probably because some super smart brain came up with the idea of dividing the actual round tortilla wraps into four “corners”, topping them individually and then folding them together super elegantly and baking them until crispy. What else could I do but try the whole thing for myself and simply fold a crispy, elegant salmon avocado tortilla and put it in the pan?


Usually I like to fill my wraps with cheese and ham and cut them into small rolls (see also Ham and Cheese Wraps), but with this technique there will definitely be a lot more to get lost in the tortilla corners in the near future. I already have quite a few ideas that start with melted cheddar and end with mozzarella! Until then, I’ll have fun with this ultra delicious salmon avocado tortilla. By the way, the salmon cooks slightly when you bake the tortilla in the pan – super tasty and juicy!

Nutritional information per serving of Salmon Avocado Tortilla
Calories: 485 – Protein: 22g – Fat: 25g – Carbs: 40g
Salmon Avocado Tortilla

Ingredients
- 2 wheat tortillas
- 30g cream cheese
- 1 avocado
- 4 slices smoked salmon
- 50g arugula
- 2 tsp mayonnaise
Directions
- Step 1 Brush the tortillas with cream cheese and cut from one side to the middle.
- Step 2 Cover all 4 corners with one ingredient each (i.e. arugula salmon, avocado and mayonnaise) and then fold together one after the other starting from the incised edge.
- Step 3 Heat a pan in half and fry the folded tortilla on both sides for 3 minutes each until crispy (without oil). Optionally serve with extra cream cheese.
If you like, you can also find me here on Pinterest and pin the following picture!

Der Beitrag Salmon avocado tortilla with arugula and mayonnaise erschien zuerst auf kitchensplace.
]]>Der Beitrag Puff Pastry Snails with Spinach erschien zuerst auf kitchensplace.
]]>
Whenever I’m invited, I think about what delicious things I could bring with me. It is important to me to try out new recipes every now and then and not always have the same souvenirs with me. This is how these delicious puff pastry snails with spinach were created. They are 100% vegan so that every guest can enjoy them too.
If there are no vegans at your next party, I can recommend my cheese and ham wraps as a souvenir. Not only do they look great, they also taste good to non-vegan guests.

Nutritional information per puff pastry snail:
Calories: 120 – Protein: 2g – Fat: 9g – Carbs: 8g
Puff pastry rolls with spinach

Ingredients
- 1 puff pastry roll
- 400g spinach (fresh)
- 60g cashew nuts
- 1 clove of garlic
- 40g olive oil
- 1 teaspoon of fresh cheese (vegan)
- Sea salt and some pepper
Directions
- Step 1 Sweat the spinach leaves in a deep pan with a little olive oil until it disintegrates. Season with a little sea eel and pepper.
- Step 2 Slightly chop the garlic clove and puree together with the cashew nuts, olive oil and some cream cheese in a blender or with the hand blender to form an even cream. Season with a little salt.
- Step 3 Roll out the puff pastry and sprinkle with the cashew cream. Then top with spinach after the spinach liquid has been squeezed out a little beforehand.
- Step 4 Roll up the roll slowly and then cut off 1-2 cm thick slices. Place these on a baking sheet and bake at 160 degrees fan-assisted for about 15-20 minutes.
If you like you can find my Pinterest here or you can pin the following picture directly to your Pinterest.

Der Beitrag Puff Pastry Snails with Spinach erschien zuerst auf kitchensplace.
]]>Der Beitrag Eggplant rolls with hummus erschien zuerst auf kitchensplace.
]]>
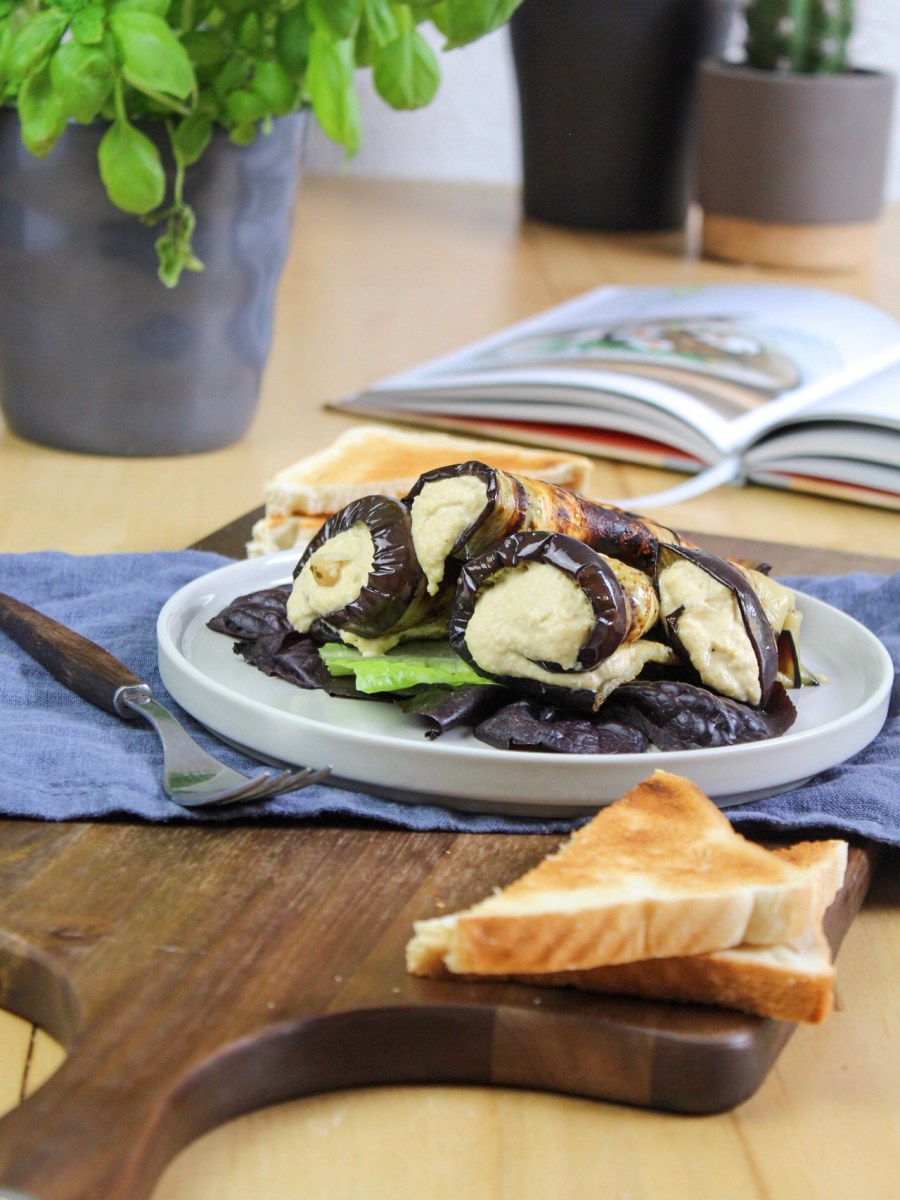
Every now and then I get inspiration from many different cookbooks. In the fitness cookbook by Pumperlgsund I came across this delicious recipe for eggplant rolls filled with hummus and tried it out myself. Equipped with eggplant and hummus, the knives were sharpened and the pan heated. I simply cut the aubergine into sufficiently thick slices (approx. 1-2cm), seasoned with salt and pepper and roasted on both sides in a little olive oil in a grill pan.
After roasting, I let the aubergines cool down a bit and then brush them with a teaspoon of hummus. Here I just used natural humus that I bought, but if you want to prepare the hummus yourself, I have it here a recipe for you.
Finally, the coated slices are simply rolled up to make eggplant rolls and arranged on a small plate.
Nutritional information per eggplant roll
Calories: 70 – Protein: 2g – Fat: 5g – Carbs: 5g
Eggplant Rolls with Hummus

Ingredients
- 2 eggplants
- 160g hummus
- sea salt
- pepper
- oil for the pan
- Optional: toast
Directions
- Step 1 Wash the eggplant and cut into 2cm thick slices. Grease a pan with oil and heat. Fry the eggplant slices on both sides until golden brown.
- Step 2 Sprinkle the eggplant with sea salt and pepper, let stand briefly and then remove from the pan. Spread each with 1-2 tsp of hummus and roll up.
-
Step 3
Optionally serve with toasted toast.

Der Beitrag Eggplant rolls with hummus erschien zuerst auf kitchensplace.
]]>Der Beitrag Summer rolls with shrimp and peanut dip erschien zuerst auf kitchensplace.
]]>
I can still remember the first time I ate these delicious Summer Rolls at the Vietnamese restaurant last summer. With no expectation and no introduction, I was served two of these crunchy rolls for starters, which were filled with fresh prawns and salad. There was also a peanut dip and extra coriander. All in all, the Summer Rolls were just perfect and since then I haven’t been able to eat enough of these small rice paper rolls.
After the temperatures reached a record high again this summer, I decided to simply prepare the Summer Rolls myself. The first attempt actually turned out to be a bit tricky, because you have to get the hang of rolling up first. I’ll explain my tricks to you now.
First of all, of course, you need rice paper as a basis. I continued to choose cucumber, carrots, lettuce, sprouts, shrimp and glass noodles for the filling. Of course, you can also fill your summer rolls differently, because creativity is limitless here.
How are the summer rolls rolled perfectly?
But now to the roll: I simply held the rice paper for a few seconds (5-6) from both sides under a jet of water and then laid it out on a damp plate. The rice paper will become more elastic in the next few moments, but will retain its basic structure. If you soak it in water for too long, it will become too soft and no longer roll up well. Then I laid out my filling except for the prawns in the upper half and rolled up half of it tightly for the first time. Then I put 3-4 shrimp on the leftover piece and folded the sides of the rice paper towards the middle so that nothing falls out at the ends. Finally the Summer Rolls are rolled up. Make sure that they are really rolled up tightly and that the sides are tightly closed. Otherwise your summer rolls will fall apart again.
If you then leave the Summer Rolls on the plate for a moment, the rice paper will solidify again by itself. Your Summer Rolls are ready!

Nutritional information per serving:
Calories: 70 – Protein: 4g – Fat: 0g – Carbs: 13g
Summer Rolls with Shrimp and Peanut Dip

Ingredients
- 4x rice paper
- 125g shrimp
- 60g glass noodles
- 40g cucumber
- 40g carrot
- 40g iceberg lettuce
- 20g sprouts
- some cilantro
- For the dip:
- 40g peanut butter
- 2 tbsp water
- juice 1/2 lime
- 1 tsp soy sauce
Directions
- Step 1 Boil the shrimp briefly in salted water. Then rinse in cold water and set aside. Cook the glass noodles in hot water and drain.
- Step 2 Dip the rice paper in water for 5 seconds. Then lay it out on a plate and top with cucumber and carrot sticks, lettuce, sprouts, glass noodles, and cilantro in the center of the top half.
- Step 3 Roll up the rice paper tightly with the filling until halfway. Place the shrimp in the center, close to the filling. Then fold the sides over to cover the contents. Then roll up completely under tension
- Step 4 Tip: Make sure the sides are closed so nothing falls out.
If you like you can find my Pinterest here or you can pin the following picture directly to your Pinterest.


Der Beitrag Summer rolls with shrimp and peanut dip erschien zuerst auf kitchensplace.
]]>Der Beitrag Focaccia with two kinds of tomatoes and onions erschien zuerst auf kitchensplace.
]]>
Focaccia is a flatbread made from yeast dough that is drizzled with olive oil, salt and various herbs before baking. It is particularly suitable as a side dish or appetizer in front of a menu or as finger food for your next party or the next Netflix evening.
My focaccia is classically prepared from yeast dough, olive oil, salt and oregano. This focaccia can be topped up as you like; I recommend a Mediterranean topping with various tomatoes, onions and basil. But you can also try my focaccia with spinach, mushrooms, olives or peppers.
The special thing about focaccia breads is the lightness that is used when baking with the addition of olive oil. That’s why I recommend that you pay particular attention to the use of first-class, extra virgin olive oil. Here is an interesting contribution to the production of a first-class olive oil: On the quality of olive oil .

Nutritional information per serving (1/2)
Calories: 456 – Protein: 17g – Fat: 6g – Carbs: 84g
Focaccia with two kinds of tomatoes and onions

Ingredients
- 500g flour
- 300ml lukewarm water
- 1x fresh yeast
- 1 tsp sugar
- 1 tsp salt
- 2 tbsp olive oil
- For the topping:
- 1 red onion
- Colorful cocktail tomatoes
- oregano, fresh basil, sea salt
- 2 tbsp olive oil
Directions
- Step 1 Dissolve the yeast in water with sugar. Then knead together with the flour, salt and olive oil until the dough is no longer sticky. Then leave to rise in the oven at 30 degrees for 1h.
- Step 2 Preheat the oven to 200 degrees. Peel the onion and cut into thin strips together with the tomatoes.
- Step 3 The dough should now have doubled in size so that it can be kneaded again and divided in half. Form two foccacia loaves from the dough pieces and make several depressions with your fingertips. Brush the dough with 1 tablespoon of olive oil each and top with onion and tomato. Press them into the cavities
- Step 4 Sprinkle with sea salt and oregano and bake in the oven for about 15 minutes. Then top with fresh basil.
If you like you can find my Pinterest here or you can pin the following picture directly to your Pinterest.

Der Beitrag Focaccia with two kinds of tomatoes and onions erschien zuerst auf kitchensplace.
]]>Der Beitrag Mini hot dogs erschien zuerst auf kitchensplace.
]]>
These mini hot dogs are something very special at every party. They are handy, crunchy, fresh and taste incredibly good. Served with the right sauces, crispy fried onions and sweet and sour pickled cucumbers, they are the absolute hit at your next party.
These mini hot dogs are prepared in a simple yeast dough that is ready within 1 hour. To do this, simply knead the yeast dissolved in milk and sugar with flour, egg, butter and a little salt and let it rise for 30 minutes. You will then receive a fluffy yeast dough in which you wrap crunchy Viennese pieces. These are then simply baked in the oven and your mini hot dog bites are ready.
You can find more finger food and party snacks here .

Nutritional information for mini hot dogs
Calories: 65 – Protein: 2g – Fat: 4g – Carbs: 6.5g
Mini Hot-Dog Bites

Ingredients
- 5 sausages
- 250g flour
- 120ml milk
- 1 egg
- 1/2 cube yeast
- 1 tsp salt
- 25 g butter, soft
- 1 tsp sugar
Directions
- Step 1 Dissolve the yeast in lukewarm milk with sugar for about 15 minutes. Then knead in a large bowl with flour, butter, half and salt until the dough is no longer sticky
- Step 2 Heat the oven to 50 degrees. Then cover the bowl and put it in the oven and turn off the oven. Now let the dough rise for about 30 minutes
- Step 3 Knead the dough well again until it can be shaped. Preheat the oven to 200 degrees O/U. Cut the sausages into 5 equal pieces each
- Step 4 Now wrap each mini-sausage with yeast dough and let it rise again on a baking tray lined with baking paper. Then spread with the other half of the egg and bake in the oven for about 25 minutes until golden brown.
If you like you can find my Pinterest here or you can pin the following picture directly to your Pinterest.

Der Beitrag Mini hot dogs erschien zuerst auf kitchensplace.
]]>Der Beitrag Homemade hummus erschien zuerst auf kitchensplace.
]]>
Even if this brownish dip is not the prettiest, it has been one of the most popular dips on the finger food buffet for some time. Hummus also refines delicious bowls or other oriental dishes with its fine, creamy taste. What should definitely not be missing in hummus is tahini – a sesame paste. You can either prepare these yourself by mixing sesame seeds with oil and pureing them finely. Alternatively, Tahini is also available in every organic market. You should also pay attention to the quality of the chickpeas used when preparing hummus. Either these are bought ready-cooked in the organic market (but then be careful not to contain any additives) or they are soaked in water in their natural and dry form for 12 hours and then boiled for about 2 hours. You can find out how to cook chickpeas yourself here: https://www.springlane.de/magazin/rezeptideen/hummus-selber-machen-grundrezept/
Prepare hummus quickly
In this recipe, I used pre-cooked chickpeas to simply save time. These are then pureed together with tahini, olive oil, water, lemon juice and fresh spices to a creamy mass. Your hummus is ready.

Nutritional Information per serving
Calories: 46 – Protein: 1g – Fat: 4g – Carbs: 2g
Homemade Hummus

Ingredients
- 200g chickpeas, ready cooked
- 1 clove of garlic
- 2 tsp tahini
- 1 lemon:5 tbsp olive oil
- 5 tbsp water
- salt, pepper
- Optional: cumin.
Directions
- Step 1 Puree the chickpeas together with the garlic clove, tahini paste, olive oil and water in a food processor or with a hand blender to a fine mass.
- Step 2 Juice one lemon and stir into the mass. Season everything with salt and pepper.
- Step 3 Stir in more water for a higher creaminess. Optionally refine with cumin.
If you like you can find my Pinterest here or you can pin the following picture directly to your Pinterest.

Der Beitrag Homemade hummus erschien zuerst auf kitchensplace.
]]>