Der Beitrag Ham and Cheese Wraps erschien zuerst auf kitchensplace.
]]>
Are you giving a party or are you invited to a party yourself? Then these ham and cheese wraps are just the right thing for all guests. All you need for the small rolls is a couple of tortilla wraps, some cream cheese, crunchy iceberg lettuce, fresh ham and creamy organic cheese. Of course, you can just leave the ham out if there are vegetarian guests on site. When all the ingredients are ready, all you have to do is coat the wraps one after the other with cream cheese and put some salad in the middle. Then you put the cheese and ham on the salad and roll the wraps up very tightly. The tighter the wraps are rolled, the nicer the result will be! Finally, you can insert small toothpicks every 3-4cm into the warp roll and then cut off small rolls at the same distance.
My ham and cheese wraps are not only ideal as finger food for parties or other occasions. You can also prepare these wraps as meal prep and store them whole in aluminum foil in the refrigerator. So you always have a delicious and light lunch for work or a snack ready to hand. If you like, you can of course fill the wraps differently! Let me know what other ideas you have. 
If you are in the mood for more finger food recipes and ideas for party snacks, please have a look around my recipe collection.

Nutritional Information per serving (approx. 5 rolls):
Calories: 335 – Protein: 16g – Fat: 18g – Carbs: 28g
Käse-Schinken-Wraps

Ingredients
- 6 Tortilla Wraps
- 100g Frischkäse
- 3-4 Blätter Eisbergsalat
- 6 Scheiben Kochschinken
- 6 Scheiben Gouda
Directions
- Step 1 Die Wraps mit Frischkäse bestreichen. In der Mitte der Wraps jeweils eine Bahn Salat, Schinken und Käse auslegen. Hierzu den Schinken und den Käse längst halbieren und über die Länge der Wraps auslegen.
- Step 2 Die Wraps eng zusammenrollen, sodass der Inhalt schön fest zusammengerollt wird. Anschließend die Wraps in 3-4cm breite Stücke schneiden und mit einem Zahnstocher aufspießen.
If you like you can find my Pinterest here or you can pin the following picture directly to your Pinterest.


Der Beitrag Ham and Cheese Wraps erschien zuerst auf kitchensplace.
]]>Der Beitrag Sweet potato soup with carrots erschien zuerst auf kitchensplace.
]]>
There are many high quality nutrients in sweet potatoes. They are a good source of minerals and vitamins because manganese, copper and iron are abundant in this tuber. There are also vitamins C, B2, B6 and E as well as biotin and high-quality fiber. It is not without reason that sweet potatoes are very popular with athletes, as they provide high-quality carbohydrates compared to normal potatoes and optimally support the body in metabolism.
Together with the carrots, this recipe for my delicious sweet potato soup makes a wonderfully simple, light and creamy soup recipe. Perfect for preparation, as a starter for a menu or just like that!

Nutritional Information per serving
Calories: 156 – Protein: 6g – Fat: 3g – Carbs: 30g
Süßkartoffelsuppe mit Möhren

Ingredients
- 2 mittelgroße Süßkartoffeln
- 2 Möhren
- 1 Zwiebel
- 1 Knoblauchzehe
- 750-900ml Gemüsebrühe
- 2 TL Creme leicht
- Salz, Pfeffer, Muskat
- optional geröstetes Brot
Directions
- Step 1 Die Süßkartoffel schälen und in Stücke schneiden. Die Möhren ungeschält in Stücke schneiden. Alles in Salzwasser kochen, bis sie weich sind.
- Step 2 Die Zwiebel und Knoblauch würfeln und in einem Topf leicht anschwitzen.
- Step 3 Die Süßkartoffeln und Möhren abschütten und zu den Zwiebeln und dem Knoblauch geben. Gemüsebrühe hinzugeben und kurz aufkochen lassen.
- Step 4 Den Topf vom Herd nehmen und alles mit einem Pürierstab fein pürieren. Mit Salz, Pfeffer und Muskat abschmecken.
- Step 5 Die Suppe servieren und jeweils 2 TL Creme leicht unterrühren. Optional noch etwas geröstetes Brot beilegen.
If you like you can find my Pinterest here or you can pin the following picture directly to your Pinterest.

Der Beitrag Sweet potato soup with carrots erschien zuerst auf kitchensplace.
]]>Der Beitrag Quark casserole with blueberries erschien zuerst auf kitchensplace.
]]>
I saw quark casserole for the very first time on social networks. Of course, I was well aware that you can bake quark and make desserts out of it (e.g. cheesecake), but I never came up with the idea of making a casserole out of quark on my own. How fatal! – I think to myself today. If you are in the mood for a dessert that can be rated as “healthy” and is super rich in protein, you won’t go wrong with this casserole.
The quark mass is quickly mixed from egg, quark, a little vanilla sugar and 1 ripe banana and refined with blueberries. For the sweet aspect, I sprinkle a cinnamon-sugar mixture on the quark mixture and off you go with this sweet dream. I would describe the baking time as an average long, especially because impatient people like me constantly run to the oven and do the stick test. But when the casserole is done, the feast really starts! But be careful: this portion is not for the small appetite!
If you feel like more Breakfast ideas have a look over here.

Nutritional information per serving of quark casserole
Calories: 514 – Protein: 36g – Fat: 6g – Carbs: 78g
Quark Casserole with Blueberries

Ingredients
- 1 ripe banana
- 1 egg
- 500g low-fat quark
- 100ml almond milk (or milk or water)
- 1x vanilla sugar
- 50g blueberries
- 2 tbsp. cinnamon & sugar
Directions
- Step 1 Mash the banana with a fork and whisk with an egg. Puree both finely and foamy with a hand blender. Fold in the vanilla sugar, low-fat quark (mixed with milk) and blueberries .
- Step 2 Pour the quark mixture into a baking dish and sprinkle with cinnamon and sugar .
- Step 3 Bake the quark casserole in the oven at 160 degrees O / U for 50 minutes until it is no longer liquid in the middle (stick test).
If you like you can find me here on Pinterest and pin the following picture.

Der Beitrag Quark casserole with blueberries erschien zuerst auf kitchensplace.
]]>Der Beitrag Rigatoni al forno with lentils erschien zuerst auf kitchensplace.
]]>
Rigatoni al forno is available in dozens of different variations. What they all have in common is that they are topped with delicious cheese. For my variant, I opted for a vegetarian rigatoni variation consisting of a mild lentil sauce with tomatoes, onions, garlic and spices. For the perfect Rigatoni al forno I still need creamy mozzarella to bake the Rigatoni crispy and of course a homemade bechamel sauce, which rounds off this recipe.
If you like, you can of course modify this recipe as you like. Whether with minced meat, ham, peas or paprika – Rigatoni al forno can be baked with anything. Take a look at my others Pasta recipes around if you feel like it.

Nutritional information per serving of Rigatoni al forno
Calories: 452 – Protein: 21g – Fat: 11g – Carbs: 67g
Rigatoni al forno with lentils

Ingredients
- 250g rigatoni
- 1 can red lentils (265g)
- 1 can chopped tomatoes (400g)
- 1 tbsp tomato paste
- 1 onion
- 2 cloves garlic
- 10g butter
- 1 tbsp flour
- 200-400ml milk
- 1 mozzarella
- salt, pepper, nutmeg, Italian herbs
- some oil for the pan
Directions
- Step 1 Cook the rigatoni in salted water until al dente. Preheat the oven to 160 degrees convection
- Step 2 In the meantime, finely dice the onion and garlic and fry them in a little oil in a deep pan. Stir in the lentils and mix with the tomato paste .
- Step 3 Bring the lentils to a boil and deglaze with the chopped tomatoes. Season with salt and pepper and stir in about 1 teaspoon of Italian herbs. Simmer the sauce over low heat for 5 minutes
- Step 4 drain the pasta and mix with the lentil sauce. Then melt the butter in a saucepan over 3/4 heat, whisk in the flour and stir in the butter-flour sponge with milk. Bring the sauce to a boil until it thickens. Season to taste with salt, pepper and nutmeg. (Tip: The sauce should be somewhat thick. Therefore, stir in more or less milk depending on your taste)
- Step 5 Now place the pasta in the sauce in a baking dish and cover with the roux. Then slice the mozzarella and spread it on the casserole. Bake the casserole in the oven for about 25 minutes, until the mozzarella is golden brown.
If you like you can find my Pinterest here or you can pin the following picture directly to your Pinterest.

Der Beitrag Rigatoni al forno with lentils erschien zuerst auf kitchensplace.
]]>Der Beitrag Apple roses made from puff pastry erschien zuerst auf kitchensplace.
]]>
For four apple roses you need the following ingredients:
- 2 apples with red skin
- 1 puff pastry (e.g. from the refrigerated shelf)
- 4 teaspoons each of apricot jam, brown sugar and cinnamon
- 1 lemon
The preparation
At the beginning you cut the apples into fine and even slices (ideally 0.5 cm) and place the slices in a bowl filled with water. Add the juice of a lemon to the water. The lemon juice prevents the apples from turning brown once they are cut open. Now put the bowl with the apples and the water in the microwave over medium heat for 2 minutes, so that the apples become soft and can be bent more easily afterwards. Then you take the puff pastry out of the refrigerator and use a pizza roller to divide it into four pale-sized lanes.

Next, coat the puff pastry sheets with 1 teaspoon of jam and sprinkle 1 teaspoon of brown sugar and 1 teaspoon of cinnamon over the sheets. The jam will later give your apple roses a fruity and fresh taste and ensure that the puff pastry does not get too dry when baking. Cinnamon and sugar round off the taste and go perfectly with the apples.
Then you take the soft apple slices and place them with the round edge facing outwards in a fan-like manner on the long side of the puff pastry sheet. You should make sure that, firstly, they are not too close to the edge and, secondly, that they touch each other lightly. In the end you will get a rosy result.


Now it’s time to get canned: The puff pastry sheets with the apples are now folded up and rolled up so that the protruding apple edges are formed into a rose. To do this, fold the free puff pastry over to the apple slices and cover the apple slices with the puff pastry. Then you roll it up into a rose. You can do this by carefully rolling the strips from one end to the other, making sure that the individual apple slices do not fall out.


After you have finished rolling up all of the apple roses, you will receive fine puff pastry roses that are baked in a muffin pan. Now a final tip: if the apple roses have been rolled up, they look a bit squashed at first. So that the apple roses rise nicely during baking and become a blooming rose, you carefully push the apple slices outwards and use them to open the rose. Make sure that the apple slices don’t bend over or fall out. Ideally, you put the apple roses in the refrigerator again beforehand so that the puff pastry stays nice and firm.


Finally, the apple roses are baked in the oven at 160 degrees O / U for about 30-40 minutes.
Nutritional information per apple rose
Calories: 324 – Protein: 4g – Fat: 16g – Carbs: 41g
Apple Roses made from Puff Pastry

Ingredients
- 1x puff pastry
- 2 red apples
- 4 tsp apricot jam
- 4 tsp brown sugar
- 4 tsp cinnamon
Directions
- Step 1 Divide the apple and remove the core. Then put the apples with the cut side on the board and cut into thin slices. Collect the apple slices in a bowl of warm water and add a dash of lemon juice.
- Step 2 Roll out the puff pastry and divide it into 4 equal-length sheets.
- Step 3 Spread the puff pastry sheets each with 1 tsp. jam and spread 1 tsp. brown sugar and 1 tsp. cinnamon on each sheet.
- Step 4 Then lay out the apple slices on the puff pastry sheets in such a way that the round edge of the apple slightly peeks over one edge side of the puff pastry. The apples should overlap slightly
- Step 5 Finally, fold the sheets in half along the uncovered end so that the apples are lightly covered. Then roll up the puff pastry from one side to the other so that small roses are formed.
- Step 6 Place the roses in a muffin tin and bake for about 40 minutes in the oven at 160 degrees O/U.
-
Step 7
Tip: To make the roses easier to roll, it is recommended to heat the apples in a water bath in the microwave beforehand so that they are easier to bend afterwards.
If you like you can find my Pinterest here or you can pin the following picture directly to your Pinterest.

Der Beitrag Apple roses made from puff pastry erschien zuerst auf kitchensplace.
]]>Der Beitrag Tortellini in Tomatensugo mit Rucola erschien zuerst auf kitchensplace.
]]>
A classic tomato sauce is actually simmered for a long time with lots of ingredients and herbs. In my recipe for tortellini with tomato sauce, I opted for the quick version by simply boiling a few fresh and sweet tomatoes with a little sugar and thyme until they turn into a delicious little sauce. Connoisseurs may now note that this is not a Sugo, but I can live with that. I could have called this recipe tortellini in tomato sauce, but then my SEO control zone might have complained that I have used this keyphrase before!  Here to the recipe “Tortellini in Tomato Sauce” .
Anyway! Whether sugo or sauce – this recipe is simply delicious, easy to prepare and does not take 1.5 hours until the sauce is ready. Plus, you don’t need 10 different herbs and oils to achieve the perfect aroma. As usual, I use conventional ingredients that you can get in every supermarket and combine them into a delicious and inconspicuous recipe in a short time.


Nutritional information per serving of tortellini in tomato sauce
Calories: 313 – Protein: 16g – Fat: 9g – Carbs: 41g
Tortellini in Tomatensugo mit Rucola

Ingredients
- 200g Tortellini
- 250g Cherry Tomaten
- 1 EL Tomatenmark
- 1 TL Zucker
- frischer Thymian
- 80g Rucola
- Salz, Pfeffer
- Parmesan zum Servieren
Directions
- Step 1 Simmer 200g cherry tomatoes in a saucepan with water for 5 minutes so that the house peel off. Put the remaining tomatoes aside. After the skin has loosened, take the tomatoes out of the water, let them cool down briefly and peel off the skin. Then put the tomatoes back in an empty saucepan, sprinkle with sugar and simmer at medium temperature for 10 minutes .
- Step 2 Cook the tortellini in salted water until al dente .
- Step 3 Mash the tomatoes in the saucepan with a fork and season with salt and pepper. Pluck thyme and stir in. Then simmer covered for another 10 minutes .
- Step 4 Now mix the tortellini with the tomato sauce, stir in the remaining tomatoes and let everything simmer for another 5 minutes. Then serve with fresh rocket and grated Parmesan.
If you like, you can me too here on Pinterest and pin the following picture.


Der Beitrag Tortellini in Tomatensugo mit Rucola erschien zuerst auf kitchensplace.
]]>Der Beitrag Fried rice with shrimp erschien zuerst auf kitchensplace.
]]>
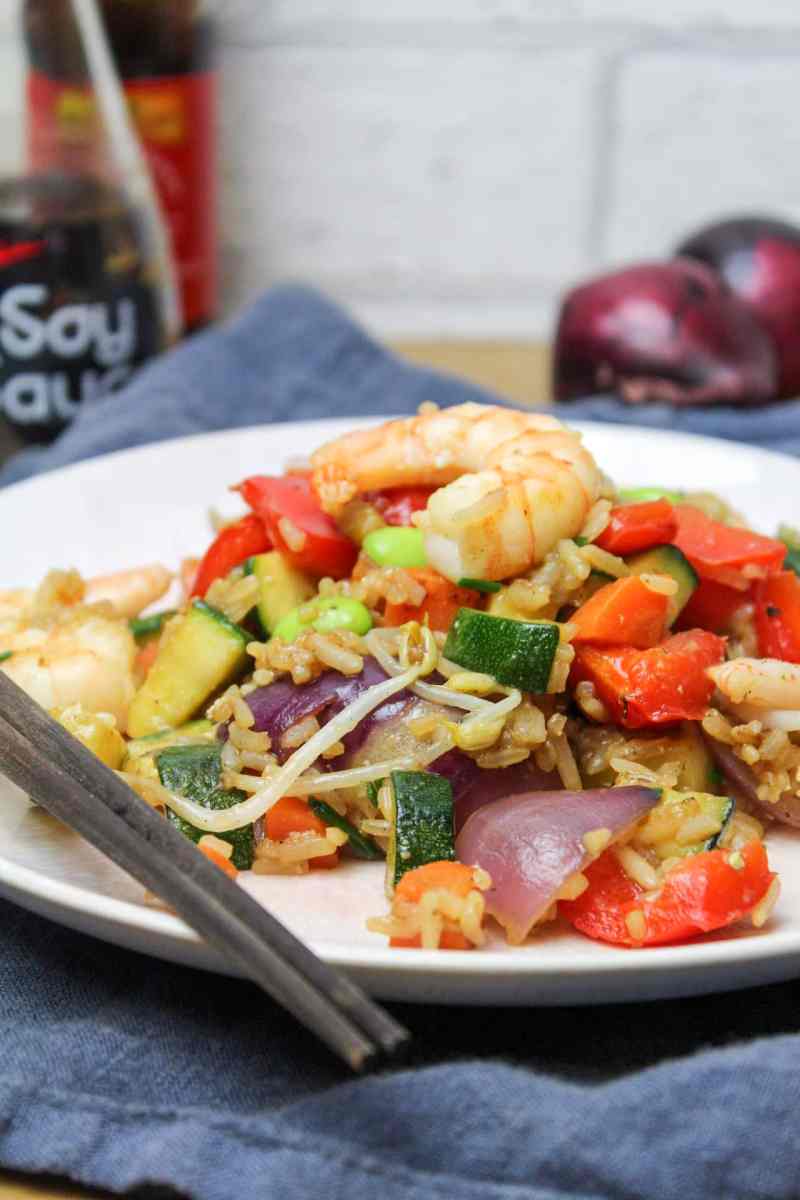
Whenever I have leftover rice in the fridge, I always have delicious Chinese fried rice. I use more vegetables, fish or meat and conjure up a completely new dish from all the leftovers. This time I actively decided to cook a little more rice so I could create this fried rice with shrimp recipe the next day. The secret behind these recipes is always the sauce that connects everything. However, it must not be too salty or too runny, which is why I worked on my perfect sauce for a long time. The result was this sauce, which I prepare with oyster sauce, soy sauce, a little water and a bit of sweetness so that it doesn’t get too salty. By the way, you can find all the ingredients in the supermarket or directly in the Asia store.
If you are in the mood for more recipes from Asian cuisine, take a look at my recipe category “ Asian dishes ” around.
Nutritional information per serving of fried rice with shrimp
Calories: 471 – Protein: 38g – Fat: 10g – Carbs: 52g
Fried Rice with Vegetables and Shrimp

Ingredients
- 200g cooked rice
- 250g black tiger prawns
- 2 cloves garlic
- 1 zucchini, 1 red onion
- 1 bell bell pepper
- 1 carrot
- 100g edamame beans
- 50g mung bean sprouts
- 2 tsp oyster sauce
- 3 tbsp soy sauce
- 3 tbsp water
- a little sweet
- oil for the pan (ideally sesame oil).
Directions
- Step 1 Cut the zucchini, bell bell pepper, garlic and carrot into cubes and fry in a little oil in a deep pan. Peel and quarter the onion, pick off the individual layers and add to the vegetables. Add the shrimp as well. Fry the vegetables and shrimp for about 5-10 minutes
- Step 2 In the meantime, mix the oyster sauce with soy sauce, water and some sweetener (e.g. 1-2 dashes of sweetener or 1/2 tsp sugar) and pour over the vegetables
- Step 3 add rice to the vegetables and fry briefly. Then deglaze everything with the sauce and stir. Add edamame and sprouts, mix and let everything steep for another 2-3 minutes.
If you like you can find me here on Pinterest in pin the following picture.

Der Beitrag Fried rice with shrimp erschien zuerst auf kitchensplace.
]]>Der Beitrag Salmon avocado tortilla with arugula and mayonnaise erschien zuerst auf kitchensplace.
]]>

I currently see crispy baked tortilla wraps more often. It is probably because some super smart brain came up with the idea of dividing the actual round tortilla wraps into four “corners”, topping them individually and then folding them together super elegantly and baking them until crispy. What else could I do but try the whole thing for myself and simply fold a crispy, elegant salmon avocado tortilla and put it in the pan?


Usually I like to fill my wraps with cheese and ham and cut them into small rolls (see also Ham and Cheese Wraps), but with this technique there will definitely be a lot more to get lost in the tortilla corners in the near future. I already have quite a few ideas that start with melted cheddar and end with mozzarella! Until then, I’ll have fun with this ultra delicious salmon avocado tortilla. By the way, the salmon cooks slightly when you bake the tortilla in the pan – super tasty and juicy!

Nutritional information per serving of Salmon Avocado Tortilla
Calories: 485 – Protein: 22g – Fat: 25g – Carbs: 40g
Salmon Avocado Tortilla

Ingredients
- 2 wheat tortillas
- 30g cream cheese
- 1 avocado
- 4 slices smoked salmon
- 50g arugula
- 2 tsp mayonnaise
Directions
- Step 1 Brush the tortillas with cream cheese and cut from one side to the middle.
- Step 2 Cover all 4 corners with one ingredient each (i.e. arugula salmon, avocado and mayonnaise) and then fold together one after the other starting from the incised edge.
- Step 3 Heat a pan in half and fry the folded tortilla on both sides for 3 minutes each until crispy (without oil). Optionally serve with extra cream cheese.
If you like, you can also find me here on Pinterest and pin the following picture!

Der Beitrag Salmon avocado tortilla with arugula and mayonnaise erschien zuerst auf kitchensplace.
]]>Der Beitrag Mushroom Cream Soup with Pork Tenderloin erschien zuerst auf kitchensplace.
]]>
I particularly like a soothing creamy mushroom soup on cold and rainy days. But it is always particularly good as a starter to a fine menu. I still remember the first time I tried this soup and then almost addicted to the creamy consistency. Back then I used to make a huge pot of this soup for myself, freeze it and keep popping up servings whenever I wanted a pleasant and creamy soup.
If you want to serve it as a full meal, you can serve it (like me here) with a hearty insert of pink roasted pork fillets. If you prefer not to eat meat, you can of course leave out the fillets and serve the mushroom cream soup without it. In my opinion, butter and parsley should not be missing. Butter gives the soup its creamy consistency and parsley gives it the finishing touch.

Nutritional information per serving of mushroom cream soup
Calories: 404 – Protein: 56g – Fat: 17g – Carbs: 5g
Cream of mushroom soup with pork fillet

Ingredients
- 800g mushrooms
- 1 onion
- 2 cloves of garlic
- 10g butter
- 100g whipped cream
- 500-800ml chicken or vegetable broth
- 800g pork fillet (organic)
- Salt, pepper, fresh parsley
Directions
- Step 1 Cut the onion and the garlic cloves into cubes and sauté them with half the butter in a large saucepan over medium heat.
- Step 2 Clean and dice the mushrooms and add them to the pot. Lightly sweat everything over medium heat.
- Step 3 Add the vegetable stock and let the contents of the pot simmer for about 20 minutes. Stir occasionally.
- Step 4 Meanwhile, cut the pork tenderloin into medallions and fry in a pan in a little oil on both sides for 1-2 minutes.
- Step 5 Take the pot off the heat and purée the soup with a hand blender until the soup is creamy. Stir in the whipped cream and the rest of the butter.
- Step 6 Chop the parsley and add to the soup together with the medallions. Season everything with salt and pepper.
- Step 7 Let the soup steep for another 5 minutes over low heat so that the fillets cook gently.
If you like you can find my Pinterest here or you can pin the following picture directly to your Pinterest.

Der Beitrag Mushroom Cream Soup with Pork Tenderloin erschien zuerst auf kitchensplace.
]]>Der Beitrag Thai cucumber salad with peanuts erschien zuerst auf kitchensplace.
]]>
Cucumber salad is definitely one of my favorite side dishes. Thai cucumber salad is one of the variations that I’ve wanted to try for myself for so long. The result was this recipe that I succeeded in straight away. As always, all you need here is simple ingredients that are all available in the supermarket and only a few minutes to prepare everything. Since the cucumber salad is not cooked, the pots will also stay cold. This saves even more time, so that you can serve this delicious cucumber salad in just 10-15 minutes. But here’s a little tip: The Thai cucumber salad tastes best when it has been able to steep for a few more minutes.
If you are interested in other recipes for cucumber salad, then take a look at my other variants. Here you will find

Nutritional information per serving of Thai cucumber salad
Calories: 339 – Protein: 7g – Fat: 29g – Carbs: 12g
Thai Cucumber Salad

Ingredients
- 1 cucumber
- 40g sesame oil
- 1 tbsp oyster sauce
- 1 tbsp white wine vinegar
- 15g rice syrup
- 60g peanuts
- 1 chilli
- some spring onion
- Salt pepper
- optional: coriander
Directions
- Step 1 Roughly peel the cucumber and cut into thin slices.
- Step 2 For the dressing, mix sesame oil with white wine vinegar, oyster sauce and rice syrup and season with salt and pepper. Mix the dressing with the cucumber slices and let everything steep.
- Step 3 Meanwhile, cut the chilli and spring onions into fine strips and chop the peanuts. Put everything together, let it steep and optionally consume with a little coriander.
If you like you can find my Pinterest here or you can pin the following picture directly to your Pinterest.

Der Beitrag Thai cucumber salad with peanuts erschien zuerst auf kitchensplace.
]]>