Der Beitrag Mushroom Cream Soup with Pork Tenderloin erschien zuerst auf kitchensplace.
]]>
I particularly like a soothing creamy mushroom soup on cold and rainy days. But it is always particularly good as a starter to a fine menu. I still remember the first time I tried this soup and then almost addicted to the creamy consistency. Back then I used to make a huge pot of this soup for myself, freeze it and keep popping up servings whenever I wanted a pleasant and creamy soup.
If you want to serve it as a full meal, you can serve it (like me here) with a hearty insert of pink roasted pork fillets. If you prefer not to eat meat, you can of course leave out the fillets and serve the mushroom cream soup without it. In my opinion, butter and parsley should not be missing. Butter gives the soup its creamy consistency and parsley gives it the finishing touch.

Nutritional information per serving of mushroom cream soup
Calories: 404 – Protein: 56g – Fat: 17g – Carbs: 5g
Cream of mushroom soup with pork fillet

Ingredients
- 800g mushrooms
- 1 onion
- 2 cloves of garlic
- 10g butter
- 100g whipped cream
- 500-800ml chicken or vegetable broth
- 800g pork fillet (organic)
- Salt, pepper, fresh parsley
Directions
- Step 1 Cut the onion and the garlic cloves into cubes and sauté them with half the butter in a large saucepan over medium heat.
- Step 2 Clean and dice the mushrooms and add them to the pot. Lightly sweat everything over medium heat.
- Step 3 Add the vegetable stock and let the contents of the pot simmer for about 20 minutes. Stir occasionally.
- Step 4 Meanwhile, cut the pork tenderloin into medallions and fry in a pan in a little oil on both sides for 1-2 minutes.
- Step 5 Take the pot off the heat and purée the soup with a hand blender until the soup is creamy. Stir in the whipped cream and the rest of the butter.
- Step 6 Chop the parsley and add to the soup together with the medallions. Season everything with salt and pepper.
- Step 7 Let the soup steep for another 5 minutes over low heat so that the fillets cook gently.
If you like you can find my Pinterest here or you can pin the following picture directly to your Pinterest.

Der Beitrag Mushroom Cream Soup with Pork Tenderloin erschien zuerst auf kitchensplace.
]]>Der Beitrag Chicken curry with rice erschien zuerst auf kitchensplace.
]]>
As you may know, I love curry dishes with delicious basmati or jasmine rice. I sometimes wonder why I didn’t like these dishes at all in the past and I get annoyed that I missed so much. Maybe that is the reason why I like to try new curry creations over and over again. This chicken curry is currently one of my favorites because it is so quick and easy to prepare and is simply an absolute soul food! Even if the calories are tough, you shouldn’t forget that this dish also contains a lot of protein. Besides – sometimes it just doesn’t matter! 
The great thing about this chicken curry is that it is so easy and quick to prepare. You only need a few ingredients here, most of which are already in the pantry. I also recommend a really fresh meat, which is best of organic quality. Even if it is more expensive, it pays off in terms of taste and society to make a contribution to the environment.

If you would like to discover more curry recipes, take a look around my Asian recipe collection.

Nutritional Information per serving
Calories: 768 – Protein: 54g – Fat: 32g – Carbs: 66g
Chicken Curry with Rice

Ingredients
- 400g sliced chicken
- 150g rice
- 1 onion
- 2 cloves of garlic
- 1 can of creamy coconut milk
- 1 tbsp tomato paste
- Salt, pepper, curry powder
- fresh coriander
- some oil to fry
Directions
- Step 1 Sear the sliced chicken in a little oil with chopped onions and garlic, so that nice toasted aromas develop on all sides.
- Step 2 Meanwhile cook the rice in salted water.
- Step 3 Deglaze the chicken with coconut milk, bring to the boil and stir in the tomato paste. Then let it reduce for about 10 minutes.
- Step 4 Season with salt, pepper and 1-2 teaspoons of curry powder and serve with fresh coriander.
If you like you can find my Pinterest here or you can pin the following picture directly to your Pinterest.


Der Beitrag Chicken curry with rice erschien zuerst auf kitchensplace.
]]>Der Beitrag Honey-lime chicken with corn-avocado salsa erschien zuerst auf kitchensplace.
]]>
Watch out: here comes my new favorite recipe! A refreshing honey-lime chicken with rice and a corn-avocado salsa. The perfect dish for warm summer days (and also ideal for the grill). Especially in summer I love to prepare salads or marinades with fresh lime juice. This gives every dish a summery touch and the right amount of refreshment. In addition, the sweet corn combined with fresh shallots, creamy avocado and fruity tomatoes is just wonderful. Everything together on one spoon is a unique taste explosion.
The combination of all ingredients goes perfectly together, but if you like, you can of course also serve the salsa as a salad or simply combine the chicken differently.

Nutritional Information per serving of Honey-Lime Chicken
Calories: 730 – Protein: 56g – Fat: 28g – Carbs: 59g
Honey-lime chicken with corn-avocado salsa

Ingredients
- 2 chicken fillets
- 120g rice
- 1 avocado
- 1 can of corn
- 1 large tomato
- 1 shallot
- 2 limes
- 2 tbsp honey
- 2 tbsp olive oil
- 1 bunch of coriander
- Salt pepper
- optional: sesame
Directions
- Step 1 Dab the chicken fillets and set aside. For the marinade, mix honey with the juice of a lime, salt and pepper and soak the fillets in it for 10 minutes.
- Step 2 Meanwhile, lightly roast the corn in a pan. Cut the avocado, shallot and tomato into cubes and store in a bowl. Add the corn and mix everything with the olive oil and lime juice. Finely chop the coriander and stir in.
- Step 3 Boil the rice in salted water.
- Step 4 Meanwhile, bring a well-coated pan to a high temperature and brown the marinated chicken fillets on both sides. (Tip: If you have, you can use a grill pan here.) When the fillets are well browned on both sides, reduce the temperature and finish cooking the meat. If there is still marinade left, simply pour it over the fillets.
- Step 5 Finally, serve everything together optionally with a few sesame seeds.
If you like you can find my Pinterest here or you can pin the following picture directly to your Pinterest.

Der Beitrag Honey-lime chicken with corn-avocado salsa erschien zuerst auf kitchensplace.
]]>Der Beitrag Asparagus Classic erschien zuerst auf kitchensplace.
]]>
What could be better than fresh asparagus directly from the farmer, classically prepared with potatoes and ham? Especially at the beginning of the season, I usually have the feeling that mankind is crazy about the white poles from the ground. In the supermarkets – I have the feeling – it is always sold out very quickly. However, if you want really good quality, I can only recommend buying it directly from trusted farmers. This means you can get it fresh from the field without the need for long supply chains. In addition, many farmers offer to peel the bars on site, so that you also save a lot of work.

Nutritional Information per serving of Asparagus
Calories: 356 – Protein: 29g – Fat: 12g – Carbs: 34g
Classic Asparagus

Ingredients
- 600g asparagus (class 1)
- 5-6 small potatoes, 3-4 slices of freshly cooked ham
- 1/2 lemon
- 20g butter
- Hollondaise sauce to taste
- Parsley, fresh
- salt
Directions
- Step 1 Peel the potatoes and simmer in well-salted water for about 20 minutes.
- Step 2 Put on another tall saucepan with salted water and heat
- Step 3 Meanwhile, peel the asparagus and remove any woody ends. Simmer the asparagus in water for about 10-15 minutes. Add a piece of butter to the water.
- Step 4 Drain the potatoes and add salt if necessary. Carefully remove the asparagus from the cooking water with tongs and drizzle with half a lemon.
- Step 5 Then serve the potatoes, asparagus and ham with the heated hollanda sauce. Serve with fresh parsley as required.
If you like you can find my Pinterest here or you can pin the following picture directly to your Pinterest.

Der Beitrag Asparagus Classic erschien zuerst auf kitchensplace.
]]>Der Beitrag Chicken teriyaki with jasberry rice and pepper mix erschien zuerst auf kitchensplace.
]]>
Do you already know Jasberry Reis? This is purple rice from Thailand, which is already being traded as a new superfood. The antioxidant capacity of jasberry rice is so high that it can not only compete with popular superfoods, but even surpass them. The value is three times as high as that of blueberries and four times as high as that of goji berries. And the best thing about it: It also tastes delicious. I combined this superfood rice with a tender chicken teriyaki and a colorful paprika mix with sesame oil and sesame seeds. You can find out more about Jasberry here .
If you feel like more dishes with meat, have a look here around.

Nutritional information per serving or Chicken Teriyaki:
Calories: 574 – Protein: 48g – Fat: 12g – 68g
Chicken Teriyaki with Rice and Paprika Mix

Ingredients
- 150g jasberry rice
- 300g chicken fillet
- 3 colorful bell peppers
- 1 red onion
- 2 cloves garlic
- 70ml soy sauce
- 2-3 tsp honey
- 1 tbsp sesame oil
- sesame seeds
- salt and pepper
Directions
- Step 1 Simmer the rice in about 500ml of salted water for about 25 minutes
- Step 2 Cut the bell bell pepper and onion into fine strips and sauté in a pan with a little sesame oil. Season with salt and pepper.
- Step 3 Meanwhile, cut the chicken fillet into fine pieces and sauté in some sesame oil in another pan. Also season with salt and pepper
- Step 4 finely chop the garlic and mix together with honey and soy sauce in a bowl. Then pour the marinade over the pieces of meat and mix. Sauté briefly.
- Step 5 Drain the rice if there is still water in the pot. Then serve everything together and sprinkle with sesame seeds.
If you like you can find my Pinterest here or you can pin the following picture directly to your Pinterest.

Der Beitrag Chicken teriyaki with jasberry rice and pepper mix erschien zuerst auf kitchensplace.
]]>Der Beitrag Egg Benedict erschien zuerst auf kitchensplace.
]]>
Do you know those cozy Sundays on which you have a lot of time and are totally in the mood for a special and unusual breakfast? I love these days and spend a lot of time there in the morning in the kitchen at home. With a lot of love I prepared this great breakfast on one of the past Sundays: a poached egg Benedict on a crispy fresh slice of bread with well-dressed lettuce, tomatoes, avocado cream and fried bacon.
How to prepare poached egg for egg Benedict well has to be learned. It didn’t work for me the first time either, but it’s the same as always: practice makes perfect. If you have never boiled a poached egg, I definitely recommend a tutorial at YouTube to look at. Alternatively, I wrote you instructions in the recipe.

Nutritional information per serving:
Calories: 416 – Protein: 18g – Fat: 24g – Carbs: 31g
Egg Benedict

Ingredients
- 1 slice gray bread
- 1 egg
- 10g mixed lettuce
- 1/2 tomato
- 100g bacon
- 25g guacamole
- 15g hollandaise
- 1 tablespoon olive oil
- 1/2 teaspoon vinegar
- 1/2 teaspoon sugar
- a little lemon juice
- vinegar for cooking
- salt, pepper
Directions
- Step 1 Bring a small pot of water to a boil with a good splash of vinegar. Crack the egg and set aside in a small bowl. Using a spoon, stir a swirl into the water in the pot. Tip: The swirl should be so heavy that you can see the bottom of the pot. Now you have to be quick: Pour the egg into the strudel so that the egg white turns around the yolk.
- Step 2 Let the egg cook in the pot for about 3-4 minutes
- Step 3 Meanwhile, fry the bacon in a pan.
- Step 4 For the salad dressing, season olive oil with vinegar, sugar, salt and pepper and a little lemon juice. Then toss the mixed salad in it and lay it out on a slice of gray bread. Slice the tomato and place it on the salad. Spread the avocado cream over the tomatoes and lay the fried bacon on top. Finally, take the poached egg out of the water and place it on the sandwich. Serve with hollandaise sauce.
If you like you can find my Pinterest here or you can pin the following picture directly to your Pinterest.

Der Beitrag Egg Benedict erschien zuerst auf kitchensplace.
]]>Der Beitrag Tex-Mex burrito erschien zuerst auf kitchensplace.
]]>
For far too long I haven’t prepared a classic fast food myself. The last time I saw and ate such delicious burritos at a food market in Amsterdam, it didn’t take long to make these burritos myself at home. With this huge variety of burrito fillings, I decided on a classic Tex-Mex variant with minced meat, corn, kidney beans, tomatoes, avocado and lettuce. This Tex-Mex burrito was rounded off with cream cheese and a little creme fraiche for the perfect creaminess inside.
This burrito is definitely something fine for a quick hunger or the big burrito obzession. If you couldn’t get enough of this burrito, you can prepare several servings directly and simply freeze them. Then the burrito just needs to be thawed and briefly warmed up in the microwave or oven. This feast is ready for any point in time.

Nutritional information per Tex-Mex burrito:
Calories: 502 – Protein: 27g – Fat: 26g – Carbs: 39g
Tex-Mex Burrito

Ingredients
- 2Wheat tortilla
- 200g ground beef, reduced fat
- 20g cream cheese
- 20g creme fraiche
- 70g avocado
- 50g corn
- 50g tomatoes
- 15g tomato paste
- 1 small onion
- 3-4 leaves lettuce
- salt, pepper, garlic, paprika.
Directions
- Step 1 Brown the minced meat in a pan until hot. Season with salt, bell pepper, garlic and paprika. Stir in the tomato paste
- Step 2 finely dice the tomato and onion and add to the pan with the corn and kidney beans and stir. Let stand briefly and then remove the pan from the heat
- Step 3 Spread the center of the wheat tortilla with cream cheese. Then spread the pan contents on top along with avocado and lettuce. Finally, spread creme fraiche over the lettuce
- Step 4 fold the sides of the tortilla inward and roll up the burrito tightly
- Step 5 serve with tomatoes and avocado cream, if desired.
If you like you can find my Pinterest here or you can pin the following picture directly to your Pinterest.

Der Beitrag Tex-Mex burrito erschien zuerst auf kitchensplace.
]]>Der Beitrag Bacon gnocchi in garlic sauce erschien zuerst auf kitchensplace.
]]>
My bacon gnocchi are true soul food. They are soothing, creamy and tasty and have it all if you take a closer look at the nutritional values. But whatever! From time to time that is also allowed.
If you love gnocchi as much as I do, then check out my recipe collection for more Gnocchi recipes around.

Nutritional Information per serving
Calories: 484 – Protein: 29g – Fat: 20g – Carbs: 46g
Bacon Gnocchi in Garlic Sauce

Ingredients
- 500g gnocchi
- 2 cloves of garlic
- 40g pancetta
- 10g butter
- 1/2 tbsp flour
- 250ml milk
- salt, pepper, nutmeg
Directions
- Step 1 Fry the gnocchi in a pan until golden brown on all sides. Melt the butter in a saucepan. Press the garlic and fry it in the butter.
- Step 2 With a whisk, quickly stir the flour into the melted butter. Pour in milk and bring to a boil, stirring, at a raised temperature until the sauce thickens. If the sauce becomes too thick, stir in more milk.
-
Step 3
Season the sauce with salt, pepper and nutmeg. Stir in the gnocchi and let stand. Cut the pancetta into strips and fry in a pan until crispy. Then stir into the gnocchi together with the juice that has run out.
If you like you can find my Pinterest here or you can pin the following picture directly to your Pinterest.

Der Beitrag Bacon gnocchi in garlic sauce erschien zuerst auf kitchensplace.
]]>Der Beitrag Potato Noodle Pan with peas, carrots and turkey strips erschien zuerst auf kitchensplace.
]]>
Peas and carrots always remind me of my childhood when my grandmother often had fresh and homemade carrot sticks with delicious peas. My mother too often made peas and carrots for us children, which we mixed with mashed potatoes and enjoyed. I used these memories as a basis for my potato noodle pan and combined the peas and carrots with potato noodles and strips of schnitzel. Rounded off with a small onion, a little butter and a light cremefine, this creates a delicious meal for the whole family.
My Potato Noodle Pan is a quick and tasty meal that is ideal for after work. You only need a few ingredients and not much time to bring this delicious potato noodle pan to the table.
If you enjoy eating potato noodles as much as I do, then this recipe may also be for Potato Noodles with pointed cabbage something for you.
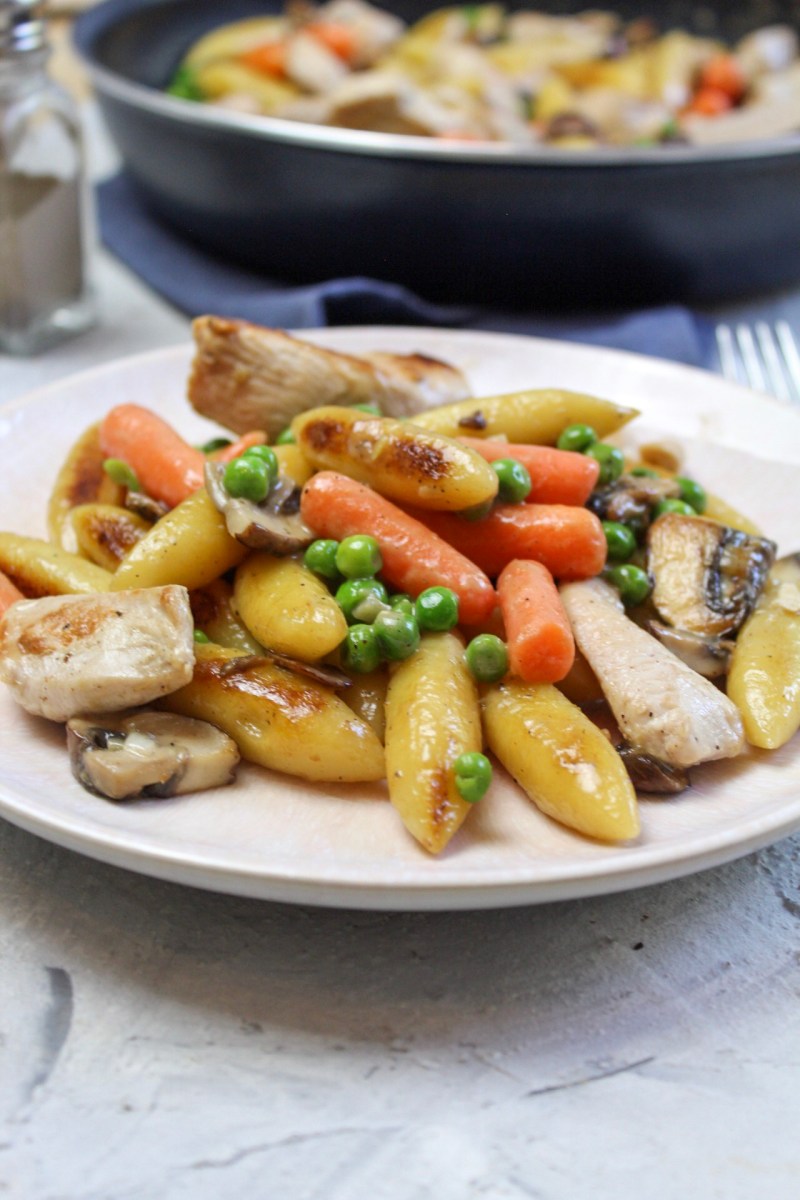
Nutritional information per serving:
Calories: 437 – Protein: 28g – Fat: 11g – Carbs: 56g
Potato noodle pan with peas, carrots and schnitzel strips

Ingredients
- 500g Schupfnudeln
- 300g organic turkey cutlets
- 100g frozen peas
- 100g frozen baby carrots
- 100g mushrooms
- 100g Cremefine 7%
- 10g butter
- 1 onion
- salt, pepper, nutmeg
Directions
- Step 1 Cut the turkey escalopes into strips and sear them in a pan for 2 minutes. Season with salt and pepper. Then remove and set aside.
- Step 2 Chop the onion and slice the mushrooms. Sauté both in the pan. Add the potato noodles and butter and fry until golden brown on all sides. Then add the peas and carrots.
-
Step 3
Stir in the cremefine. Add the meat and mix everything together. Season to taste with salt, pepper and nutmeg.

Der Beitrag Potato Noodle Pan with peas, carrots and turkey strips erschien zuerst auf kitchensplace.
]]>Der Beitrag Meatloaf with feta erschien zuerst auf kitchensplace.
]]>
If you enter the keyword meatloaf on Google, you will be overwhelmed by dozens of results with recipes. There are endless variations: pure meatloaf, meatloaf with various spices, stuffed meatloaf or meatloaf with bacon. Personally, I prefer the simple version filled with feta. I prefer to use pure ground beef, as the mixed version combined with feta simply brings too much fat on the plate.
My recipe for meatloaf with feta is simple and easy: You need pure ground beef (ideally from a local butcher) and an old bread roll soaked in water. In addition there is feta, some Dijon mustard, 1 organic egg, some butter as well as onion, garlic and selected spices. From these ingredients you form an even meat dough that is simply cooked in the oven. For the meatloaf, I recommend delicious boiled potatoes and a simple green salad as a side dish.

Nutritional Information per serving
Calories: 371 – Protein: 26g – Fat: 24g – Carbs: 12g
Meatloaf with Feta

Ingredients
- 300g ground beef
- 75g feta
- 1 onion
- 1 clove garlic
- 10g butter
- 1 egg
- 1/2 tsp Dijon mustard
- 1 roll
- water
- salt, bell pepper, paprika powder
- some oregano
Directions
- Step 1 Soak the roll in water. Meanwhile, finely dice the onion and garlic and sauté in the butter. Cut the feta into cubes and knead the minced meat with the garlic and onion mixture, an egg and mustard. Wring out the roll and add it in small pieces. Knead everything into an even mass and fold in the feta cubes. Season sufficiently with salt, bell pepper, paprika powder and some oregano.
- Step 2 Preheat the oven to 180 degrees O/U. Form the minced mixture into an even lump and place in a baking dish. Then bake in the oven for about 45 minutes.
If you like you can find my Pinterest here or you can pin the following picture directly to your Pinterest.

Der Beitrag Meatloaf with feta erschien zuerst auf kitchensplace.
]]>