Der Beitrag Apple Cinnamon Rolls erschien zuerst auf kitchensplace.
]]>
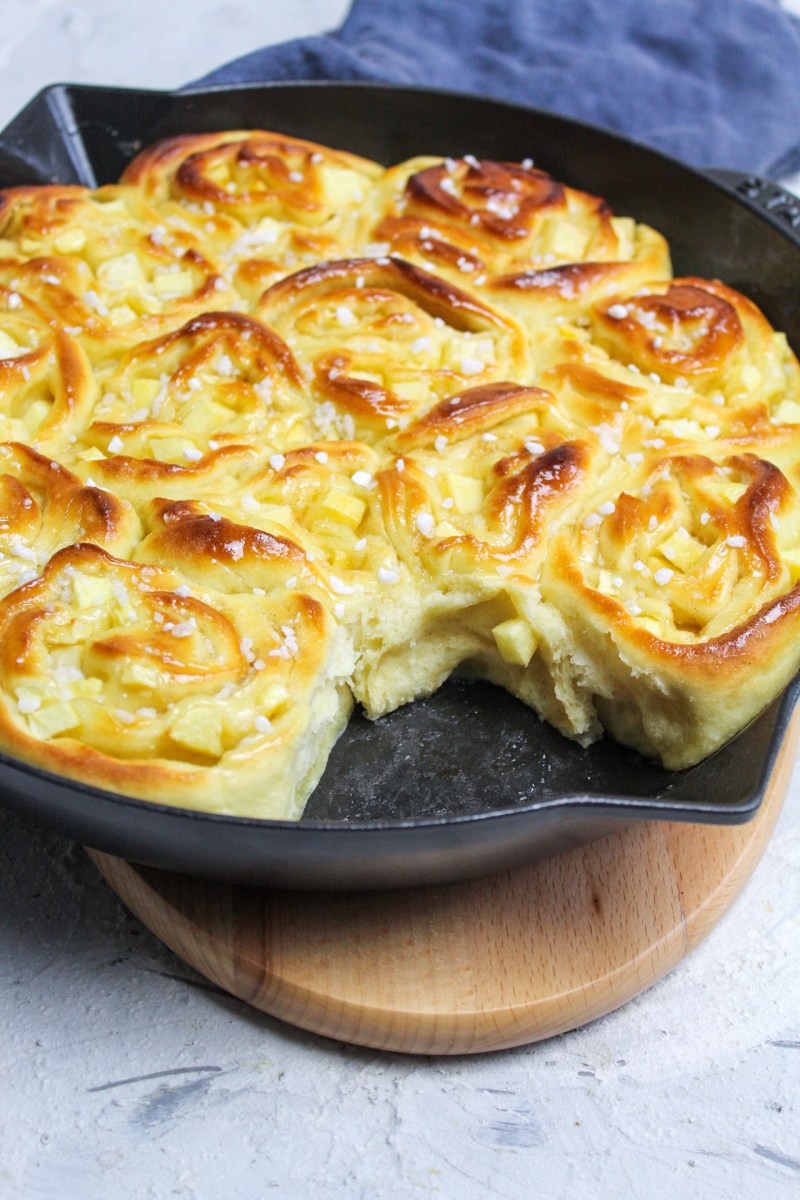
I have to admit that it’s been a while since I baked again and, above all, prepared an extra yeast dough. But if you want fluffy cinnamon rolls, you can’t avoid the homemade yeast dough. I used to screw up a yeast dough like this a few times and today I still don’t know what the problem was. But as the saying goes: Practice makes perfect.
So: when you have overcome the first hurdle of the yeast dough, nothing stands in the way of these delicious cinnamon rolls with apple filling. The filling is really prepared in no time with just a few ingredients and is simply spread on the rolled out yeast dough. Then all you have to do is roll up the yeast dough and cut your snails off the roll. You can find detailed step-by-step instructions in the recipe below.
Nutritional information per cinnamon roll
Calories: 128 – Protein: 2,5g – Fat: 4g – Carbs: 21g
Apple Cinnamon Rolls

Ingredients
- For the yeast dough :
- 250 g flour
- 1/2 cube of yeast
- 50g sugar
- 1 pinch of salt
- 125ml milk (alternatively almond milk)
- 25g soft butter (alternatively vegan butter)
- Vanilla flavor
- For the filling :
- 2 apples
- 2 tbsp butter
- 1 teaspoon cane sugar
- 1 teaspoon cinnamon
- Miscellaneous: lump sugar for sprinkling
Directions
- Step 1 First prepare the yeast dough: warm the milk with butter, crumble in the yeast and stir
- Step 2 Then mix all the dry ingredients and stir in the yeast milk. Knead everything together to form a dough and cover and let rise in a warm place for about 1 hour. (Tip: I preheat the oven to 30 degrees, turn it off and let the dough rise in it.)
- Step 3 Now prepare the filling: peel the apples and cut into fine cubes. Heat the butter in a saucepan and caramelize the apples with the sugar and cinnamon. Then set aside.
- Step 4 When the dough is ready, roll it out evenly into a rectangle and brush with the apple filling .
- Step 5 Carefully roll up the dough on the long side and cut into even pieces or slices.
- Step 6 Grease an oven pan and place the slices in the pan with the cut surface facing down.
- Step 7 Then let the snails rise for another 30 minutes while preheating the oven to 180 degrees.
- Step 8 Brush the snails with milk before baking and then bake for about 20-30.
- Step 9 When the cinnamon buns are ready, you can sprinkle them with crystal sugar.
If you like you can find my Pinterest here or you can pin the following picture directly to your Pinterest.

Der Beitrag Apple Cinnamon Rolls erschien zuerst auf kitchensplace.
]]>Der Beitrag Easter wreath with granulated sugar erschien zuerst auf kitchensplace.
]]>
In your opinion, what shouldn’t be missing at Easter? For me there are some delicious things, but first and foremost, of course, the fluffy Easter wreath made from a sweet yeast dough. Whether with sweet jam, chocolate cream or a delicious dip, this yeast wreath is always the highlight on the Easter breakfast table. Here I’ll show you how easy it is to prepare it yourself.
You don’t need a lot of ingredients for my fluffy Easter wreath. The most important thing is that you use fresh yeast and not dry yeast. There are certainly many recipes with dry yeast, but I recommend fresh yeast so that this yeast braid will really rise. Of course, the following applies: the fresher, the better. Of course, there are also flour, butter, sugar, milk, eggs, a little salt and, for the portion, extra fresh lemon zest. Mix a small pre-dough from yeast, milk and flour, let it rise for a few minutes and then mix it with the remaining ingredients. Like any yeast dough, my Easter wreath takes some time to rise and grow properly. Therefore, I recommend that you let it rise in a warm place for at least 30-60 minutes. Then you can process the yeast dough wonderfully, form 3 small rolls of dough out of it and weave them together to make this beautiful Easter wreath.
The wreath then has to go for a few more minutes and if you have done everything right, you will already notice how much the yeast plait rises. That’s exactly how it should be. I like to coat my Easter wreath with fresh milk before baking so that it gets a nice shine. In addition, I always sprinkle an extra portion of granulated sugar over the dough, so that it becomes nice and crunchy afterwards and makes for a great mouthfeel. But here, as always, the following applies: everyone as they please!
If you basically like to make yeast dough, then why not try mine fluffy brioche bread . Also covered with granulated sugar, it is suitable for every season of the year.


Nutritional information per serving of Easter wreath (1/8)
Calories: 474 – Protein: 11g – Fat: 16g – Carbs: 70g
Easter Wreath

Ingredients
- 500g flour type 405
- 1 yeast cube (42g)
- 250ml lukewarm milk
- 90g butter
- 100g sugar
- 2 eggs
- 1 pinch salt
- 1 teaspoon lemon zest
- 2 tablespoons hail sugar
- 1 tablespoon milk for coating
Directions
- Step 1 Pour the flour into a large bowl, form a small hollow in the center with your hand and pour in the warmed milk. Carefully crumble the yeast cube into the milk and stir briefly with a fork. Then cover and let rise in a warm place for 15 minutes
- Step 2 add to the flour soft butter, sugar, 2 eggs, a little salt and lemon zest and knead everything into a smooth dough for about 5-10 minutes. Cover the dough again and let it rise for another 30 minutes in a warm place
- Step 3 the dough should have increased properly by now, so you can work it further. Remove the dough from the bowl, knead briefly and divide into 3 equal pieces. Then roll out each piece into a 50cm long roll, knead the ends together and then braid all the dough strands into a plait
- Step 4 Join the yeast plait together at both ends and shape into a wreath. Place an oven-proof dish in the center, keeping the spacing
- Step 5 Brush the Easter wreath with milk, cover carefully and let it rise for another 15 minutes. Meanwhile, preheat the oven to 160 degrees O/U.
- Step 6 Bake everything at 160 degrees O/U for about 40 minutes until lightly browned.
If you like, you can me too here on Pinterest and pin the following picture.


Der Beitrag Easter wreath with granulated sugar erschien zuerst auf kitchensplace.
]]>Der Beitrag Fudge brownies erschien zuerst auf kitchensplace.
]]>
Fudge brownies are probably best known from the USA. That is where they originate from and are very often sold in coffee shops. The special thing about these brownies is that they are so juicy and chocolatey. They almost stick in your mouth when you bite into them and the chocolate gets more and more in your mouth. An unbelievable mouthfeel! Unfortunately, these fudge brownies come at a price because they are incredibly high in calories and sugar. These brownies are made from real chocolate and not just from baking cocoa and then add a good amount of sugar so that they get their crispy surface when baking. So if you’re looking for a low-calorie brownie recipe, you’ve come to the wrong place. But I promise that it is absolutely worthwhile to dig deep into your calorie pot!
As already described, my fudge brownies are made from real chocolate. I mix dark chocolate with a high percentage of cocoa (over 70%) with the same percentage of milk chocolate. There are also eggs, sugar, salt, vanilla flavor and flour. For the extra kick of chocolate, I add a few extra dark chocolate drops to my fudge brownies, because they melt during baking and make for an even juicier core.
If you’re in the mood for more sweet treats, then take a look at mine Baking recipes around. Here you will find more delicious ideas for sweet hunger!


Nutritional information per fudge brownie
Calories: 168 – Protein: 2g – Fat: 9g – Carbs: 19g
Fudge Brownies

Ingredients
- 100g dark chocolate
- 100g milk chocolate
- 85g butter, melted
- 2 eggs
- vanilla flavoring
- pinch of salt
- 110g flour
- 220g sugar
- 25g chocolate drops
- 30ml almond milk.
Directions
- Step 1 Melt the chocolate in the warm melted butter. Then stir in 2 eggs and add the sugar
- Step 2 stir the mixture until smooth and add a little vanilla flavoring and a pinch of salt. Then sift in the flour and stir everything together with the almond milk until smooth
- Step 3 optionally fold in extra chocolate drops and then pour the batter into an ovenproof dish. Ideally, line the pan with baking paper
- Step 4 bake the brownies at 175 degrees for about 25-30 minutes (test with a stick).
If you like, you can me too here on Pinterest and pin the following picture.


Der Beitrag Fudge brownies erschien zuerst auf kitchensplace.
]]>Der Beitrag Rhubarb crumble erschien zuerst auf kitchensplace.
]]>
I love this time when spring wakes up, the first warm spring days are approaching and everything is green and colorful – or, in the case of rhubarb, glowing red – sprouting. The fact that I have unfortunately suffered from a not so pleasant pollen allergy for a few years now only slightly alleviates my joy. Of course, it would be nicer if you could experience this great time without any restrictions, but well. Unfortunately you can’t have everything! I consoled myself during this time with wonderfully fresh and seasonal products, such as this rhubarb crumble. Tartly sweet and then wonderfully crispy, this recipe for rhubarb crumble is the perfect companion for the first days of spring. Whether for a small group or the whole family – this crumble will do it all! The really nice thing about this recipe is that you really don’t need a lot of ingredients or a lot of time. Actually, all you have to do is get yourself some fresh rhubarb and then you can almost start! Most of them already have traditional ingredients such as butter, flour, sugar and salt at home. If that works out too, just go to the supermarket around the corner quickly!
By the way, at this nice time I recommend going straight to the next weekly market and looking at all the other great seasonal products. There you will not only get rhubarb, but probably also wild garlic, asparagus or fresh potatoes. Have a look at my asparagus recipes if you feel like it!
For preparation
The preparation is completely simple: cut the rhubarb into small pieces, stir with sugar and some cornstarch and set aside. In the meantime, knead the crumble dough by kneading cold butter with flour, a little salt and a little sugar. Put the rhubarb in a baking dish and pluck small pieces from the crumble batter and spread them on the rhubarb until everything is well covered. Zack – the rhubarb crumble is ready and now all you need to do is bake it in the oven. PS If you prefer it sweeter, you should perhaps taste again whether there is enough sugar in the rhubarb. This is known to be very acidic by nature!

Nutritional information per serving of rhubarb crumble
Calories: 455 – Protein: 3g – Fat: 21g – Carbs: 61g
Rhubarb Crumble

Ingredients
- For the rhubarb filling:
- 2-3 rhubarb stalks
- 75g sugar
- 1 tsp cornstarch
- For the crumble:
- 100g butter
- 120g flour
- 80g sugar
- 1 pinch salt
- To serve: Some vanilla ice cream and/or powdered sugar.
Directions
- Step 1 Cut the rhubarb into pieces of about 2cm and mix well together with butter and a little cornstarch. Allow to stand for about 10 minutes and then place in an ovenproof dish
- Step 2 For the crubmle, cut the cold butter into pieces and knead together with the flour and sugar and a little salt. This works best with the dough hook or directly with your hands.
- Step 3 When the dough is smooth, pick off small pieces of dough with your hands and spread them irregularly on the rhubarb until everything is covered.
- Step 4 Bake the crumble in the oven for about 30-40 minutes at 160 degrees O/U (depending on how thick the layer of dough is).
- Step 5 Serve with vanilla ice cream and/or powdered sugar.
If you like, you can me too here on Pinterest and pin the following picture.

Der Beitrag Rhubarb crumble erschien zuerst auf kitchensplace.
]]>Der Beitrag Apple Turnovers erschien zuerst auf kitchensplace.
]]>
These crispy and juicy apple pockets are really easy to prepare. You only need a few ingredients and you don’t need a lot of time until these delicious little pouches are ready on the table. I also use ready-made puff pastry from the freezer in this recipe. You can get this in every common supermarket and it simply has the advantage that the puff pastry no longer has to be prepared yourself and it is already pre-formed into suitable slices. This makes it even easier to make these delicious apple turnovers yourself.
Prepare apple turnovers
In addition to the puff pastry, you will of course also need fresh apples. I recommend a rather floury apple (e.g. Boskoop), as these become nice and soft when baked and make the apple pocket even more juicy. I peel and dice the apples very quickly, mix them with a little water, lime juice, cinnamon and sugar and let them cook gently in the microwave for 3-4 minutes. Meanwhile, the dough can be wonderfully prepared. I brush it with some jam (I like apricot jam best for my apple pockets) and sprinkle a little cinnamon and sugar over it. Then 3-4 tablespoons of the apple pieces can be spread over the dough, which are then covered with another sheet of dough. Of course, the more apples you put in your apple pocket, the juicier and fuller it will be in the end. Since the dough will rise a lot during baking, I recommend giving it a little air by making 2-3 cuts in the lid with a sharp knife. This also gives the bag a nice look later on.


Apart from the cuts in the pastry lid, you should continue to press the puff pastry slices on the edge with a fork so that the apples do not fall out afterwards. This gives the apple pockets a nice pattern when they rise during baking. There are of course no limits to your creativity. Whether you just make even notches with a fork or even simply press the dough together with a spoon or your fingers is of course up to you. By the way, you can preheat the oven to 180 degrees while you’re preparing the apple turnovers. In the end, that saves a few more minutes of time.
If you’re in the mood for more puff pastry recipes, then check out mine Apple roses made from puff pastry at.

Nutritional Information per serving
Calories: 283 – Protein: 6g – Fat: 20g – Carbs: 22g
Apple Fritters

Ingredients
- 3 apples
- 12 puff pastry slices (from the freezer)
- 4 tsp. jam
- 4 tsp. cinnamon & sugar
- 100ml milk
Directions
- Step 1 Remove the puff pastry slices from the freezer and let thaw for 20 minutes. In the meantime, wash, peel and cut the apples into even cubes .
- Step 2 Divide the puff pastry sheets in half. Brush one half with jam and sprinkle with cinnamon and sugar. Spread 3-4 tbsp apple pieces in the middle. Then cover with another slice of puff pastry, carefully press the sides and press together with a fork .
- Step 3 Cut the lid of the bags with a sharp knife and brush with milk. Sprinkle some cinnamon and sugar on top and then bake the apple turnovers for about 45 minutes in the oven at 180 degrees O / U.
If you like you can find my Pinterest here or you can pin the following picture directly to your Pinterest.

Der Beitrag Apple Turnovers erschien zuerst auf kitchensplace.
]]>Der Beitrag Chocolate Chip Banana Bread erschien zuerst auf kitchensplace.
]]>
I actually have banana bread every now and then. I always try out new recipes. For example, I already have one healthy banana bread without sugar and fat tried or another variant with Chocolate and whole bananas on the crust . There are probably dozen other variants that you can try out here. And I’ll probably add a few more to my recipe collection as well. 
With this chocolate chip banana bread, I mainly used leftovers. This includes, of course, a few ripe bananas, eggs, but also ground almonds and some whole milk couverture that are left over from the last baking campaign. Even if the almonds are hardly noticeable in the finished baked result, I believe that they are especially good for the consistency. This chocolate chip banana bread is really juicy and fluffy in the end. If you expect a compact bread here, you will unfortunately be wrong.
By the way, I don’t use any extra sugar in this recipe. The more ripe the bananas, the sweeter the banana bread can become on its own. In addition, the chocolate gives off a lot of sweetness afterwards, so that additional sugar is not necessary. If you still prefer it sweeter, you can of course use a sweetener of your own choice. Without any extra sugar, this chocolate chip banana bread has around 112 calories per slice in the end.


Nutritional information per slice of chocolate chip banana bread
Calories: 112 – Protein: 3.5g – Fat: 5g – Carbs: 12g
Chocolate Chip Banana Bread

Ingredients
- 2 bananas
- 3 eggs
- 2 tablespoons canola oil
- 50g ground almonds
- 180g flour
- 1x vanilla sugar
- 1 teaspoon baking powder
- 100ml almond milk
- 30g whole milk chocolate in pieces
Directions
- Step 1 Preheat the oven to 180 degrees O / U .
- Step 2 Mash the banana together with the eggs with a fork. Then whisk with a hand mixer .
- Step 3 Stir rapeseed oil, almonds, flour, vanilla sugar and baking powder into the batter one after the other and whisk everything into a creamy mixture. Finally stir in the almond milk together with the chocolate chips .
- Step 4 Fill a greased loaf pan with the dough and bake in the oven for about 50 minutes (stick test).
If you like you can find my Pinterest here or you can pin the following picture directly to your Pinterest.

Der Beitrag Chocolate Chip Banana Bread erschien zuerst auf kitchensplace.
]]>Der Beitrag Apple roses made from puff pastry erschien zuerst auf kitchensplace.
]]>
For four apple roses you need the following ingredients:
- 2 apples with red skin
- 1 puff pastry (e.g. from the refrigerated shelf)
- 4 teaspoons each of apricot jam, brown sugar and cinnamon
- 1 lemon
The preparation
At the beginning you cut the apples into fine and even slices (ideally 0.5 cm) and place the slices in a bowl filled with water. Add the juice of a lemon to the water. The lemon juice prevents the apples from turning brown once they are cut open. Now put the bowl with the apples and the water in the microwave over medium heat for 2 minutes, so that the apples become soft and can be bent more easily afterwards. Then you take the puff pastry out of the refrigerator and use a pizza roller to divide it into four pale-sized lanes.

Next, coat the puff pastry sheets with 1 teaspoon of jam and sprinkle 1 teaspoon of brown sugar and 1 teaspoon of cinnamon over the sheets. The jam will later give your apple roses a fruity and fresh taste and ensure that the puff pastry does not get too dry when baking. Cinnamon and sugar round off the taste and go perfectly with the apples.
Then you take the soft apple slices and place them with the round edge facing outwards in a fan-like manner on the long side of the puff pastry sheet. You should make sure that, firstly, they are not too close to the edge and, secondly, that they touch each other lightly. In the end you will get a rosy result.


Now it’s time to get canned: The puff pastry sheets with the apples are now folded up and rolled up so that the protruding apple edges are formed into a rose. To do this, fold the free puff pastry over to the apple slices and cover the apple slices with the puff pastry. Then you roll it up into a rose. You can do this by carefully rolling the strips from one end to the other, making sure that the individual apple slices do not fall out.


After you have finished rolling up all of the apple roses, you will receive fine puff pastry roses that are baked in a muffin pan. Now a final tip: if the apple roses have been rolled up, they look a bit squashed at first. So that the apple roses rise nicely during baking and become a blooming rose, you carefully push the apple slices outwards and use them to open the rose. Make sure that the apple slices don’t bend over or fall out. Ideally, you put the apple roses in the refrigerator again beforehand so that the puff pastry stays nice and firm.


Finally, the apple roses are baked in the oven at 160 degrees O / U for about 30-40 minutes.
Nutritional information per apple rose
Calories: 324 – Protein: 4g – Fat: 16g – Carbs: 41g
Apple Roses made from Puff Pastry

Ingredients
- 1x puff pastry
- 2 red apples
- 4 tsp apricot jam
- 4 tsp brown sugar
- 4 tsp cinnamon
Directions
- Step 1 Divide the apple and remove the core. Then put the apples with the cut side on the board and cut into thin slices. Collect the apple slices in a bowl of warm water and add a dash of lemon juice.
- Step 2 Roll out the puff pastry and divide it into 4 equal-length sheets.
- Step 3 Spread the puff pastry sheets each with 1 tsp. jam and spread 1 tsp. brown sugar and 1 tsp. cinnamon on each sheet.
- Step 4 Then lay out the apple slices on the puff pastry sheets in such a way that the round edge of the apple slightly peeks over one edge side of the puff pastry. The apples should overlap slightly
- Step 5 Finally, fold the sheets in half along the uncovered end so that the apples are lightly covered. Then roll up the puff pastry from one side to the other so that small roses are formed.
- Step 6 Place the roses in a muffin tin and bake for about 40 minutes in the oven at 160 degrees O/U.
-
Step 7
Tip: To make the roses easier to roll, it is recommended to heat the apples in a water bath in the microwave beforehand so that they are easier to bend afterwards.
If you like you can find my Pinterest here or you can pin the following picture directly to your Pinterest.

Der Beitrag Apple roses made from puff pastry erschien zuerst auf kitchensplace.
]]>Der Beitrag Lemon Cake erschien zuerst auf kitchensplace.
]]>
Lemon cake always reminds me of my childhood, because it was usually always on cake buffets at children’s birthdays, sporting events or other school celebrations. Even if it is actually quite simple, it has always prevailed in my children’s hearts over chocolate cake, Danube wave or even Fanta cake. I liked it best when it was refreshingly sour and fluffy. Without cream, without anything – just lemon cake.
Today I created my own recipe for extra fluffy lemon cake that only requires a few ingredients but a lot of lemons. Whether in the box form or as a sheet cake, I am sure that this cake will still exist on every cake buffet today. Find other cake recipes here.

Nutritional Information per serving of lemon cake (1/15)
Calories: 295 – Protein: 5g – Fat: 16g – Carbs: 32g
Juicy Lemon Cake

Ingredients
- 6 eggs
- 200g sugar
- 300g flour
- 250g margarine
- 3 lemons
- 1x vanilla sugar
- 1x baking powder
- 250g powdered sugar
Directions
- Step 1 Preheat the oven to 180 degrees.
- Step 2 Beat the eggs with the sugar until frothy. Sift the flour and stir into the egg mixture together with the margarine, vanilla sugar and baking powder.
- Step 3 Grate and squeeze the lemons. Stir the zest into the batter and set aside the lemon juice for the glaze. Stir the dough well again and then pour it into a greased loaf pan. Bake at 180 degrees for approx. 50-60 minutes (stick test).
- Step 4 For the glaze, mix lemon juice and powdered sugar to a thick mixture. Take the baked cake out of the oven, remove it from the mold after a while to cool down and prick it several times with a stick. Then pour over the glaze so that the lemon cake stays nice and juicy.
If you like you can find my Pinterest here or you can pin the following picture directly to your Pinterest.

Der Beitrag Lemon Cake erschien zuerst auf kitchensplace.
]]>Der Beitrag Healthy banana bread with no added sugar or fat erschien zuerst auf kitchensplace.
]]>
Healthy banana bread – you like to read that, right? Banana bread is something fine, but there is delicious banana bread often added with extra sugar, butter, chocolate or other delicacies. I do not agree with it either, because my favorite banana bread up to now was a
If you are in the mood for more banana bread recipes, take a look at my recipe collection.


Nutritional Inforamtion per serving (1/12) of healthy banana bread
Calories: 156 – Protein: 5g – Fat: 4g – Carbs: 25g
Healthy Banana Bread

Ingredients
- 2 ripe bananas
- 2 eggs
- 145g applesauce
- 1 teaspoon Baking powder
- 280g wheat flour
- 40g ground hazelnuts
- optional sweetener
Directions
- Step 1 Mash the bananas with a fork and mix with the eggs and applesauce.
- Step 2 Mix baking powder with flour and stir slowly into the banana mixture.
- Step 3 Fold in the hazelnuts and optionally add a little sweetener (if the bananas are not already sweet enough).
- Step 4 Preheat the oven to 160 degrees, grease a loaf pan and pour in the dough. Then bake for about 50 minutes at 160 degrees O / U. Chopstick test at the end to see if the bread is done.
If you like you can find my Pinterest here or you can pin the following picture directly to your Pinterest.

Der Beitrag Healthy banana bread with no added sugar or fat erschien zuerst auf kitchensplace.
]]>Der Beitrag Subway Cookies erschien zuerst auf kitchensplace.
]]>
Who doesn’t know and love them, the classic Subway Chocolate Chip Cookies with their crispy edges and soft core? Here I will show you how you can easily make them yourself with just a few ingredients and very quickly. But be careful: These cookies are addictive!
How soft the core actually is can of course not be captured very well in a picture. That’s why I’ve added a video here in which you can see for yourself what happens when the cookie is “broken”.
If you make these Subway cookies yourself, you shouldn’t look too closely at the nutritional information, because if you are honest, these cookies actually only consist of butter and sugar and a little flour to hold the dough together. But whatever: every now and then something has to be easy, right?
If you like, you can of course vary the cookies as you like. Whether with macadamia, smarties or other great fillings, there are no limits here. Tell me in the comments which cookie is your favorite?


Nutritional information per cookie
Calories: 200 – Protein: 2g – Fat: 12g – Carbs: 21g
Subway Cookies

Ingredients
- 250g butter
- 1 egg
- 60g white sugar
- 60g brown sugar
- 60g cane sugar
- 1x vanilla sugar
- 1 teaspoon baking soda
- 300g flour
- 1 tbsp sunflower oil
- 100g chocolate chips
- 1 pinch of salt
Directions
- Step 1 Mix the butter (preferably a little softer) with the sugar and vanilla sugar. Then add the egg and stir again.
- Step 2 Add flour and baking soda and stir. Then stir in some sunflower oil and the chocolate chips.
- Step 3 Preheat the oven to 160 degrees circulating air. Line a baking sheet with parchment paper and use a tablespoon to form individual dough puffs with enough space between them on the baking sheet. (Tip: works ideally with an ice cream scoop as the balls melt in the oven and become a cookie.)
- Step 4 Bake the cookies for 10-15 minutes, until the edges are lightly browned and the center is still soft. Then let cool down well.
If you like you can find my Pinterest here or you can pin the following picture directly to your Pinterest.

Der Beitrag Subway Cookies erschien zuerst auf kitchensplace.
]]>