Der Beitrag Ham and Cheese Wraps erschien zuerst auf kitchensplace.
]]>
Are you giving a party or are you invited to a party yourself? Then these ham and cheese wraps are just the right thing for all guests. All you need for the small rolls is a couple of tortilla wraps, some cream cheese, crunchy iceberg lettuce, fresh ham and creamy organic cheese. Of course, you can just leave the ham out if there are vegetarian guests on site. When all the ingredients are ready, all you have to do is coat the wraps one after the other with cream cheese and put some salad in the middle. Then you put the cheese and ham on the salad and roll the wraps up very tightly. The tighter the wraps are rolled, the nicer the result will be! Finally, you can insert small toothpicks every 3-4cm into the warp roll and then cut off small rolls at the same distance.
My ham and cheese wraps are not only ideal as finger food for parties or other occasions. You can also prepare these wraps as meal prep and store them whole in aluminum foil in the refrigerator. So you always have a delicious and light lunch for work or a snack ready to hand. If you like, you can of course fill the wraps differently! Let me know what other ideas you have. 
If you are in the mood for more finger food recipes and ideas for party snacks, please have a look around my recipe collection.

Nutritional Information per serving (approx. 5 rolls):
Calories: 335 – Protein: 16g – Fat: 18g – Carbs: 28g
Käse-Schinken-Wraps

Ingredients
- 6 Tortilla Wraps
- 100g Frischkäse
- 3-4 Blätter Eisbergsalat
- 6 Scheiben Kochschinken
- 6 Scheiben Gouda
Directions
- Step 1 Die Wraps mit Frischkäse bestreichen. In der Mitte der Wraps jeweils eine Bahn Salat, Schinken und Käse auslegen. Hierzu den Schinken und den Käse längst halbieren und über die Länge der Wraps auslegen.
- Step 2 Die Wraps eng zusammenrollen, sodass der Inhalt schön fest zusammengerollt wird. Anschließend die Wraps in 3-4cm breite Stücke schneiden und mit einem Zahnstocher aufspießen.
If you like you can find my Pinterest here or you can pin the following picture directly to your Pinterest.


Der Beitrag Ham and Cheese Wraps erschien zuerst auf kitchensplace.
]]>Der Beitrag Apple Cinnamon Rolls erschien zuerst auf kitchensplace.
]]>
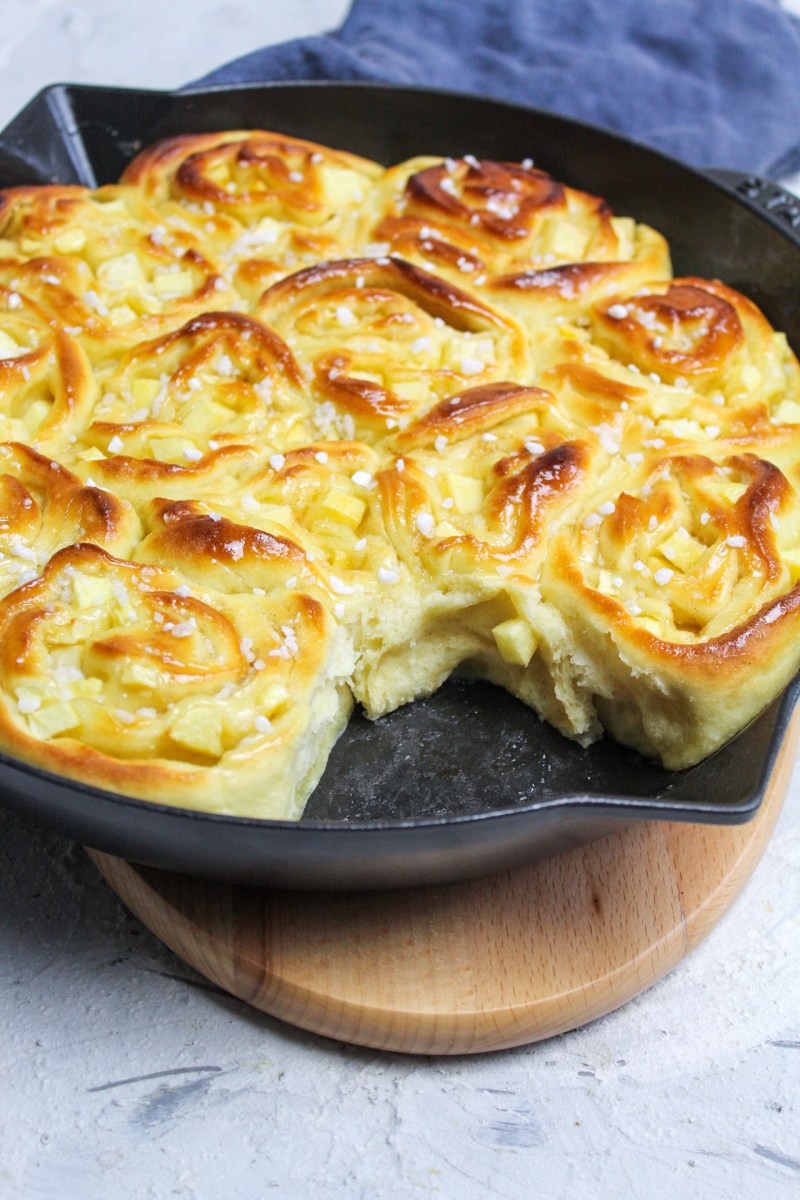
I have to admit that it’s been a while since I baked again and, above all, prepared an extra yeast dough. But if you want fluffy cinnamon rolls, you can’t avoid the homemade yeast dough. I used to screw up a yeast dough like this a few times and today I still don’t know what the problem was. But as the saying goes: Practice makes perfect.
So: when you have overcome the first hurdle of the yeast dough, nothing stands in the way of these delicious cinnamon rolls with apple filling. The filling is really prepared in no time with just a few ingredients and is simply spread on the rolled out yeast dough. Then all you have to do is roll up the yeast dough and cut your snails off the roll. You can find detailed step-by-step instructions in the recipe below.
Nutritional information per cinnamon roll
Calories: 128 – Protein: 2,5g – Fat: 4g – Carbs: 21g
Apple Cinnamon Rolls

Ingredients
- For the yeast dough :
- 250 g flour
- 1/2 cube of yeast
- 50g sugar
- 1 pinch of salt
- 125ml milk (alternatively almond milk)
- 25g soft butter (alternatively vegan butter)
- Vanilla flavor
- For the filling :
- 2 apples
- 2 tbsp butter
- 1 teaspoon cane sugar
- 1 teaspoon cinnamon
- Miscellaneous: lump sugar for sprinkling
Directions
- Step 1 First prepare the yeast dough: warm the milk with butter, crumble in the yeast and stir
- Step 2 Then mix all the dry ingredients and stir in the yeast milk. Knead everything together to form a dough and cover and let rise in a warm place for about 1 hour. (Tip: I preheat the oven to 30 degrees, turn it off and let the dough rise in it.)
- Step 3 Now prepare the filling: peel the apples and cut into fine cubes. Heat the butter in a saucepan and caramelize the apples with the sugar and cinnamon. Then set aside.
- Step 4 When the dough is ready, roll it out evenly into a rectangle and brush with the apple filling .
- Step 5 Carefully roll up the dough on the long side and cut into even pieces or slices.
- Step 6 Grease an oven pan and place the slices in the pan with the cut surface facing down.
- Step 7 Then let the snails rise for another 30 minutes while preheating the oven to 180 degrees.
- Step 8 Brush the snails with milk before baking and then bake for about 20-30.
- Step 9 When the cinnamon buns are ready, you can sprinkle them with crystal sugar.
If you like you can find my Pinterest here or you can pin the following picture directly to your Pinterest.

Der Beitrag Apple Cinnamon Rolls erschien zuerst auf kitchensplace.
]]>Der Beitrag Easter wreath with granulated sugar erschien zuerst auf kitchensplace.
]]>
In your opinion, what shouldn’t be missing at Easter? For me there are some delicious things, but first and foremost, of course, the fluffy Easter wreath made from a sweet yeast dough. Whether with sweet jam, chocolate cream or a delicious dip, this yeast wreath is always the highlight on the Easter breakfast table. Here I’ll show you how easy it is to prepare it yourself.
You don’t need a lot of ingredients for my fluffy Easter wreath. The most important thing is that you use fresh yeast and not dry yeast. There are certainly many recipes with dry yeast, but I recommend fresh yeast so that this yeast braid will really rise. Of course, the following applies: the fresher, the better. Of course, there are also flour, butter, sugar, milk, eggs, a little salt and, for the portion, extra fresh lemon zest. Mix a small pre-dough from yeast, milk and flour, let it rise for a few minutes and then mix it with the remaining ingredients. Like any yeast dough, my Easter wreath takes some time to rise and grow properly. Therefore, I recommend that you let it rise in a warm place for at least 30-60 minutes. Then you can process the yeast dough wonderfully, form 3 small rolls of dough out of it and weave them together to make this beautiful Easter wreath.
The wreath then has to go for a few more minutes and if you have done everything right, you will already notice how much the yeast plait rises. That’s exactly how it should be. I like to coat my Easter wreath with fresh milk before baking so that it gets a nice shine. In addition, I always sprinkle an extra portion of granulated sugar over the dough, so that it becomes nice and crunchy afterwards and makes for a great mouthfeel. But here, as always, the following applies: everyone as they please!
If you basically like to make yeast dough, then why not try mine fluffy brioche bread . Also covered with granulated sugar, it is suitable for every season of the year.


Nutritional information per serving of Easter wreath (1/8)
Calories: 474 – Protein: 11g – Fat: 16g – Carbs: 70g
Easter Wreath

Ingredients
- 500g flour type 405
- 1 yeast cube (42g)
- 250ml lukewarm milk
- 90g butter
- 100g sugar
- 2 eggs
- 1 pinch salt
- 1 teaspoon lemon zest
- 2 tablespoons hail sugar
- 1 tablespoon milk for coating
Directions
- Step 1 Pour the flour into a large bowl, form a small hollow in the center with your hand and pour in the warmed milk. Carefully crumble the yeast cube into the milk and stir briefly with a fork. Then cover and let rise in a warm place for 15 minutes
- Step 2 add to the flour soft butter, sugar, 2 eggs, a little salt and lemon zest and knead everything into a smooth dough for about 5-10 minutes. Cover the dough again and let it rise for another 30 minutes in a warm place
- Step 3 the dough should have increased properly by now, so you can work it further. Remove the dough from the bowl, knead briefly and divide into 3 equal pieces. Then roll out each piece into a 50cm long roll, knead the ends together and then braid all the dough strands into a plait
- Step 4 Join the yeast plait together at both ends and shape into a wreath. Place an oven-proof dish in the center, keeping the spacing
- Step 5 Brush the Easter wreath with milk, cover carefully and let it rise for another 15 minutes. Meanwhile, preheat the oven to 160 degrees O/U.
- Step 6 Bake everything at 160 degrees O/U for about 40 minutes until lightly browned.
If you like, you can me too here on Pinterest and pin the following picture.


Der Beitrag Easter wreath with granulated sugar erschien zuerst auf kitchensplace.
]]>Der Beitrag Garganelli alla Panna erschien zuerst auf kitchensplace.
]]>
When I was on vacation in Italy this summer, I was of course always looking for an original and local pasta dish. I finally found my master in the small town of Ravenna, known for its mosaics. Simple and classic Italian dishes were served in an Italian tavern. Including this recipe for Garganelli alla Panna – a pasta that is very similar to the penne, with a creamy cream sauce and fresh prosciutto cotto. Supposedly simple, but just plain good.
Anyone who has ever eaten a real alla panna sauce knows what I mean when I say that these are not just pasta with cream sauce. The combination of fresh egg, cream, salt and nutmeg combined with the right amount of pasta water and a good feeling for cooking temperatures just melts young and old. Any type of pasta goes well with it, whether spaghetti, penne alla panna or even tortellini alla panna.
If you like this recipe for Garganelli alla Panna, you might also like my Tortellini alla Panna with processed cheese.


Nutritional information per serving of Garganelli alla Panna
Calories: 788 – Protein: 33g – Fat: 40g – Carbs: 72g
Garganelli alla Panna

Ingredients
- 250g fresh garganelli
- 100g cooked ham (in pieces)
- 3 egg yolks
- 250g cream
- 20g butter
- salt, nutmeg, pepper
- 1-2 ladles pasta water
Directions
- Step 1 Cook the pasta in salted water until al dente
- Step 2 Meanwhile, dice the ham and fry in a deep pan over medium heat
- Step 3 Separate the eggs and mix the yolks together with the cream. Season with a good portion of salt and nutmeg. Use the egg whites elsewhere
- Step 4 add the al dente pasta to the ham and toss. Then reduce heat and add the cream-egg mixture. Add a ladle of pasta water as well as butter and stir everything together. Allow the sauce to thicken over low heat, whisking constantly, adding a little more pasta water depending on the consistency. The sauce should be creamy
-
Step 5
serve the pasta with fresh pepper.
If you like you can find my Pinterest here or you can pin the following picture directly to your Pinterest.

Der Beitrag Garganelli alla Panna erschien zuerst auf kitchensplace.
]]>Der Beitrag Thai vegetables with chicken and rice erschien zuerst auf kitchensplace.
]]>In this post I’ll show you a super easy and quick recipe for balanced Thai vegetables with chicken and rice. There is also a delicious and sweet soy sauce. This Thai vegetable curry recipe is super easy to prepare and is particularly suitable for a quick after-work meal or a quick lunch break.

With Thai people around the corner, this recipe is probably one of the classics, but there are always different variations. Personally, I really like to eat a delicious wok vegetable recipe with balanced ingredients, great flavors and a sweet soy sauce for lunch, because I don’t feel too full afterwards and have consumed a good combination of nutrients. In addition, this Thai vegetable curry is super quick to prepare yourself and is perfect if you still have a lot of vegetables in the fridge that need to be processed.
The preparation of this recipe is really easy. You can even vary the ingredients as you like, but I have identified my favorite combination for this Thai vegetable with these different vegetables. All ingredients result in a wonderful combination of flavors. Seared zucchini and juicy peppers with the sweet onions, crispy snow peas and soft mushrooms create a wonderful mouthfeel. There are also juicy pieces of chicken and firm rice in a salty-sweet soy sauce. My absolute favorite among the Thai recipes!
If you’re in the mood for more fixed Thai recipes, maybe my recipe is for Chicken curry with rice or mine Asian noodles with chicken something for you.

Nutritional information per serving of Thai vegetables
Calories: 602 – Protein: 44g – Fat: 10g – Carbs: 82g
Thai vegetables with chicken and rice

Ingredients
- 150g rice, raw
- 250g organic chicken fillet
- 1 zucchini
- 1 red onion
- 2 cloves garlic
- 1 bell bell pepper
- 150g mushrooms
- 75g snow peas
- 1 handful sprouts
- fresh cilantro
- salt
- sesame oil for the pan
- For the sauce:
- 1.5 tsp oyster sauce
- 1 tsp honey
- 2 tbsp soy sauce
- 2 tbsp water
Directions
- Step 1 Cook the rice in salted water until al dente.
- Step 2 Dice the chicken and garlic and sauté in a little sesame oil in a deep pan or wok for about 3 minutes. Then set aside.
- Step 3 Dice the zucchini, bell bell pepper and mushrooms and sauté in the same pan. Peel the onion, remove the individual layers and cut into coarse pieces. Then add to the vegetables.
- Step 4 For the sauce, mix honey with oyster sauce, soy sauce and water. Add the sauce to the vegetables and bring to a boil briefly over 3/4 heat. Lastly, add the snow peas and cook briefly.
- Step 5 Finely chop the cilantro and mix with the vegetables along with the sprouts. Serve everything together.
- Step 6 Tip: Make sure that the vegetables remain firm to the bite. It is best to prepare everything in advance and add the ingredients to the pan little by little to hit the individual cooking points.
If you like you can find my Pinterest here or you can pin the following picture directly to your Pinterest.

Der Beitrag Thai vegetables with chicken and rice erschien zuerst auf kitchensplace.
]]>Der Beitrag Pasta Bolognese erschien zuerst auf kitchensplace.
]]>Some days it just has to be pasta – and what sauce usually fits better than a good Bolognese? You can find it in many places all over the world, but a really good Bolognese is rarely there. Sometimes the sauce is too oily, sometimes too watery and sometimes even without tomato flavor. My recipe for Bolognese is fresh, tomato-sweet and spicy and is based on the Italian original.

Have you ever eaten or even prepared an original Italian Bolognese? If so, then you probably know that the right Bolognese should simmer at least 2h, if not longer. I tried the long cooking time in this recipe and can tell you that it is worth it! The long cooking time makes the bolognese sauce super smooth, tender and soft. All the ingredients combine through the long cooking time and out comes an intense, flavorful and round sauce. By the way, did you know that the original Italian recipe includes bacon in addition to ground beef, carrots, celery and tomatoes? Neither did I! Unfortunately, I didn’t have any pancetta on hand for this bolognese, so I left it out of this recipe. If you’re curious, give it a try.
By the way, for my bolognese I used linguine – a slightly thicker spaghetti. The sauce sticks a little better than on thin spaghetti, but if you like it more traditional, of course, you can just go for spaghetti. No matter what type of pasta, this sauce is ultimately the queen of the recipe! As a side dish to this delicious Pasta Bolognese, I can furthermore recommend my simple lettuce with Grandma’s salad dressing. This makes the recipe really round.


Nutritional Information per serving of pasta bolognese
Calories: 691 – Protein: 39g – Fat: 27g – Carbs: 104g
Pasta Bolognese

Ingredients
- 500g pasta of choice
- 500g ground beef
- 2-3 carrots
- 2-3 stalks of celery
- 2 shallots
- 2 cans of chopped tomatoes (approx. 800g)
- 100ml red wine
- 100ml vegetable stock
- salt, pepper, basil dried & fresh
- 1 tbsp olive oil
- optional: 1 tbsp sugar500g pasta of choice
- 500g ground beef
- 2-3 carrots
- 2-3 stalks of celery
- 2 shallots
- 2 cans of chopped tomatoes (approx. 800g)
- 100ml red wine
- 100ml vegetable stock
- salt, pepper, basil dried or fresh
- 1 tbsp. olive oil
- optional: 1 tbsp. sugar
Directions
- Step 1 Finely dice the shallots, carrots and celery. Heat a pot with olive oil and sweat the shallots first. After 1-2 minutes, add the carrots and celery and sauté for about 5 minutes. Then add the minced meat and fry until hot
- Step 2 deglaze the minced meat with red wine and bring to the boil until the alcohol has evaporated. Then add 2 cans of chopped tomatoes and some vegetable broth, stir well and simmer with the lid on for about 1.5-2h.
- Step 3 When the cooking time is over, cook the pasta in salted water. Meanwhile, season the bolognese with salt, pepper and basil to taste. Optionally add 1 tablespoon of sugar to support the sweetness of the tomatoes
- Step 4 Serve pasta together with the sauce and optionally add Parmesan cheese and fresh basil.
If you like, you can me too here on Pinterest and pin the following picture.

Der Beitrag Pasta Bolognese erschien zuerst auf kitchensplace.
]]>Der Beitrag Pizza roses erschien zuerst auf kitchensplace.
]]>
Pizza roses are wonderful finger food and an eye-catcher at every party. They are easy to prepare, can be filled in a variety of ways, look great and taste incredibly delicious. I used salami and mozzarella in this recipe. The combination of salami and mozzarella is of course perfect, as the shape of the salami can perfectly imitate the rose petals. You can of course also try other fillings and combinations (e.g. Hawaii with boiled ham and pineapple), but in order to maintain the rose shape, it is important that at least one of your components retains a natural round or semicircular shape. Can you think of any other combinations that they can be filled with?
If you are looking for more finger food recipes, then take a look at my recipe category for Finger food & party snacks around. There you will find more delicious ideas for every occasion – for example my delicious ones Ham and cheese wraps or my crunchy ones Mini hot dog bites .

Nutritional information per serving of Pizza Roses
Calories: 285 – Protein: 14g – Fat: 11g – Carbs: 32g
Pizza Roses

Ingredients
- 400g pizza dough
- 100g strained tomatoes
- 300g sliced salami
- 200g grated mozzarella
- 1 tsp oregano
- salt
Directions
- Step 1 Mix the tomatoes with oregano and a pinch of salt. Then spread evenly on the rolled out pizza dough and sprinkle with mozzarella
- Step 2 Divide the dough into 6 even sheets. Then lay out halved slices of salami on each sheet so that the round edge extends beyond the edge of the dough, leaving the bottom edge of the dough free and the slices overlapping each other. (Tip: It’s best to watch the recipe video.)
- Step 3 Now fold over the free edge of the dough and cover the salami slices. Then carefully roll up the dough from one side
-
Step 4
Bake the Pizza Rosen in a muffin tray at 180 degrees convection for about 20 minutes.
If you like you can also find me here on Pinterest and pin the following pictures.


Der Beitrag Pizza roses erschien zuerst auf kitchensplace.
]]>Der Beitrag Fudge brownies erschien zuerst auf kitchensplace.
]]>
Fudge brownies are probably best known from the USA. That is where they originate from and are very often sold in coffee shops. The special thing about these brownies is that they are so juicy and chocolatey. They almost stick in your mouth when you bite into them and the chocolate gets more and more in your mouth. An unbelievable mouthfeel! Unfortunately, these fudge brownies come at a price because they are incredibly high in calories and sugar. These brownies are made from real chocolate and not just from baking cocoa and then add a good amount of sugar so that they get their crispy surface when baking. So if you’re looking for a low-calorie brownie recipe, you’ve come to the wrong place. But I promise that it is absolutely worthwhile to dig deep into your calorie pot!
As already described, my fudge brownies are made from real chocolate. I mix dark chocolate with a high percentage of cocoa (over 70%) with the same percentage of milk chocolate. There are also eggs, sugar, salt, vanilla flavor and flour. For the extra kick of chocolate, I add a few extra dark chocolate drops to my fudge brownies, because they melt during baking and make for an even juicier core.
If you’re in the mood for more sweet treats, then take a look at mine Baking recipes around. Here you will find more delicious ideas for sweet hunger!


Nutritional information per fudge brownie
Calories: 168 – Protein: 2g – Fat: 9g – Carbs: 19g
Fudge Brownies

Ingredients
- 100g dark chocolate
- 100g milk chocolate
- 85g butter, melted
- 2 eggs
- vanilla flavoring
- pinch of salt
- 110g flour
- 220g sugar
- 25g chocolate drops
- 30ml almond milk.
Directions
- Step 1 Melt the chocolate in the warm melted butter. Then stir in 2 eggs and add the sugar
- Step 2 stir the mixture until smooth and add a little vanilla flavoring and a pinch of salt. Then sift in the flour and stir everything together with the almond milk until smooth
- Step 3 optionally fold in extra chocolate drops and then pour the batter into an ovenproof dish. Ideally, line the pan with baking paper
- Step 4 bake the brownies at 175 degrees for about 25-30 minutes (test with a stick).
If you like, you can me too here on Pinterest and pin the following picture.


Der Beitrag Fudge brownies erschien zuerst auf kitchensplace.
]]>Der Beitrag Italian pasta salad erschien zuerst auf kitchensplace.
]]>
Italian pasta salad is often prepared in many ways. But what mostly belongs to it are tomatoes, pine nuts and rocket! These ingredients go really well together and, above all, can be eaten wonderfully cold.
For the noodles, I opted for delicious mussel noodles. These are usually available in a well-stocked supermarket or directly in Italian specialist shops and make the pasta salad a little highlight. There are also fresh and sweet cherry tomatoes, creamy mozzarella, spicy rocket and roasted pine nuts. The dressing is also simple and quick: all you need is some red pesto (Pesto Rosso), olive oil, and salt and pepper. If you like, you can of course also make your own pesto. However, I opted for the faster option!
If you are in the mood for more salad ideas or side dishes, take a look at mine Recipe collection around. There you will not only find many other pasta recipes, but also other hearty and light dishes.

Nutritional information per serving of Italian pasta salad
Calories: 326 – Protein: 12g – Fat: 9g – Carbs: 47g
Italian Pasta Salad

Ingredients
- 500g pasta of choice
- 250g cherry tomatoes
- 30g pine nuts
- 1 mozzarella
- 50g sun-dried tomatoes
- 1-2 handfuls arugula
- 2 tablespoons pesto rosso
- 2 tablespoons olive oil
- salt, pepper
- some basil.
Directions
- Step 1 Cook the pasta in salted water and then let it cool
- Step 2 Meanwhile, cut the cherry tomatoes in half, chop the sun-dried tomatoes and the mozzarella, chop the basil and toast the pine nuts over medium heat
- Step 3 In a large bowl, mix the cooled pasta with all the ingredients. Season the Pesto Rosso with olive oil, salt and pepper and mix with the pasta. Add arugula to taste.
If you like, you can me too here on Pinterest and pin the following picture.

Der Beitrag Italian pasta salad erschien zuerst auf kitchensplace.
]]>Der Beitrag Wild Garlic Risotto erschien zuerst auf kitchensplace.
]]>
My wild garlic risotto is fresh and delicious and goes perfectly with spring salads, fish and meat. Together with sweet shallots and parmesan, this creamy risotto is a real eye-catcher on the spring table. While everything is turning green outside, the kitchen is also preparing for spring. This wild garlic risotto is light and delicious!
By the way, I picked the wild garlic for this recipe myself! I spotted it on a hiking door (the smell of garlic in the forest suddenly couldn’t be overlooked) and cut off a small bundle. It doesn’t get any fresher! And it was worth it – because the wild garlic risotto in the evening was just incredibly tasty and fresh. Nevertheless, you should be careful that you find the right amount of wild garlic. Too much can no longer make this risotto pleasant. So I recommend: Season to taste, season to taste, season to taste!
If you fancy even more risotto variations, then have a look at one of mine Recipe collection around! In addition to this wild garlic risotto, you will also find many other variations.

Wild Garlic Risotto

Ingredients
- 150g risotto rice
- 1 bunch wild garlic
- 1 shallot
- 1 clove garlic
- 20g butter
- 30g parmesan
- 1l vegetable stock
- salt, pepper
- some olive oil
- For the wild herb salad:
- 1x wild herb salad
- 3 tbsp rapeseed oil
- 1 tbsp vinegar
- 1 tbsp pomegranate vinegar
- 1 tsp sugar
- salt, pepper
Directions
- Step 1 Finely dice shallot and garlic and sauté in a little olive oil. Add the risotto rice and fry briefly. Then deglaze with a little vegetable stock and bring to the boil while stirring .
- Step 2 Finely chop the wild garlic and add to the risotto. Bring everything to a simmer at 3/4 of the temperature and keep pouring in the vegetable stock .
- Step 3 When the grain is still firm to the bite, grate the parmesan and stir in with the butter. Now only add as much stock as the consistency is desired. Let the risotto finish
- Step 4 For the salad, mix rapeseed oil with vinegar and season with salt, pepper and sugar. Then marinate the salad .
- Step 5 Serve both together.
If you like, you can me too here on Pinterest and pin the following picture.

Der Beitrag Wild Garlic Risotto erschien zuerst auf kitchensplace.
]]>